Advanced Opencart Import Export Tool Opencart Plugin Documentation
Author : ISHI THEMES
Created : 02 February 2020
Thank you! We are glad that you have choosen us.
Social Login is our enhanced and beautifully designed responsive Opencart theme for your Social Login online stores. Social Login is rich with powerful userfriendly features that would attract more clients to your online store and boost sales!
Here are some basics on installing, configuring and customizing the theme that will get you started! This document is written very carefully by keeping mind Beginners, advanced users and developers.
If you are new to Opencart. Please read Opencart GUIDE first and then get along with the theme document.
Getting Support
In case our documentation does not serve your queries.Please feel free to contact our support team via email Here. Please be sure to include your site URL as well as your admin and FTP details when you contact our support team.Thanks so much!
Our support scope
Our Product Import Export covers configurations related to the theme, trouble using any features of the theme and bug fixes with the theme. We don't provide Social Login for customizations or 3rd party extensions.
Support response time
We try our best to serve our clients around the clock, however, this is not always possible due to different time zones. The team will try to reply you as fast as possible.
In case you ask for help in the weekend, you may have to wait a little bit for Product Import Export, please be patient.
Please rate our Plugin and keep encouraging us!
Installation Advanced Product Import Export Plugin
Advanced Product Import Export Tool module will allow Product Import Export in your Opencart Store.
Basic Installation Steps
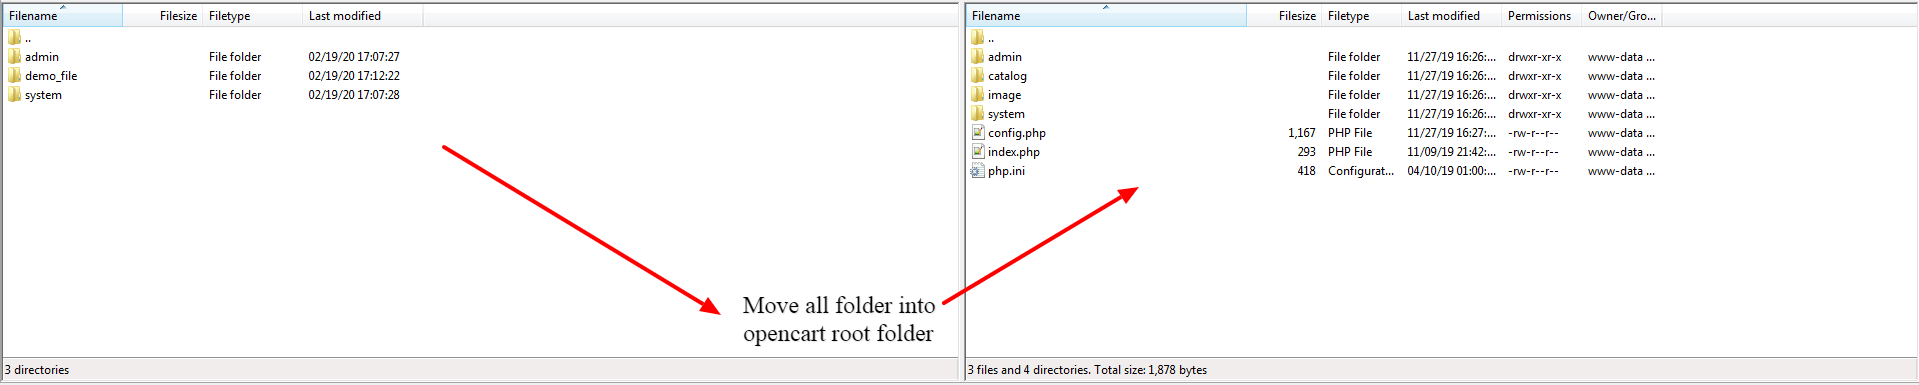
- Installation of Advanced Product Import Export Tool for Opencart is very simple. After extracting the zip file, you will find folders admin, demo_file and system. Now, copy these admin and demo_file and system folders into the root directory of your Opencart installation. Please view the screenshot below for better understanding.
Note : This step is applicable only for the opencart versions 3.x and above 3.x
- Once you have copied the folders in the previous step, then login to admin and from the main menu go to Extensions->Extension installer and upload the ZIP file – "advanced_opencart_import_export_tool.ocmod.zip". The ZIP file can be found root folder of the downloaded zip.

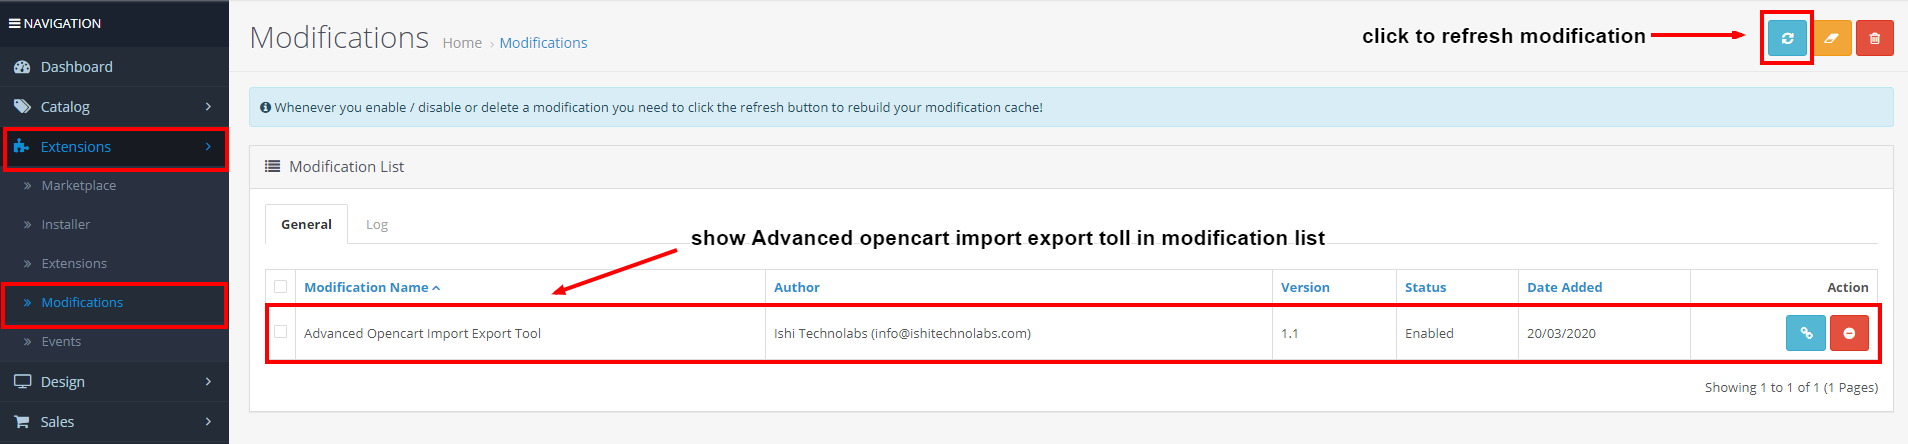
- Now, go to the Extensions > Modification and click on refresh field.
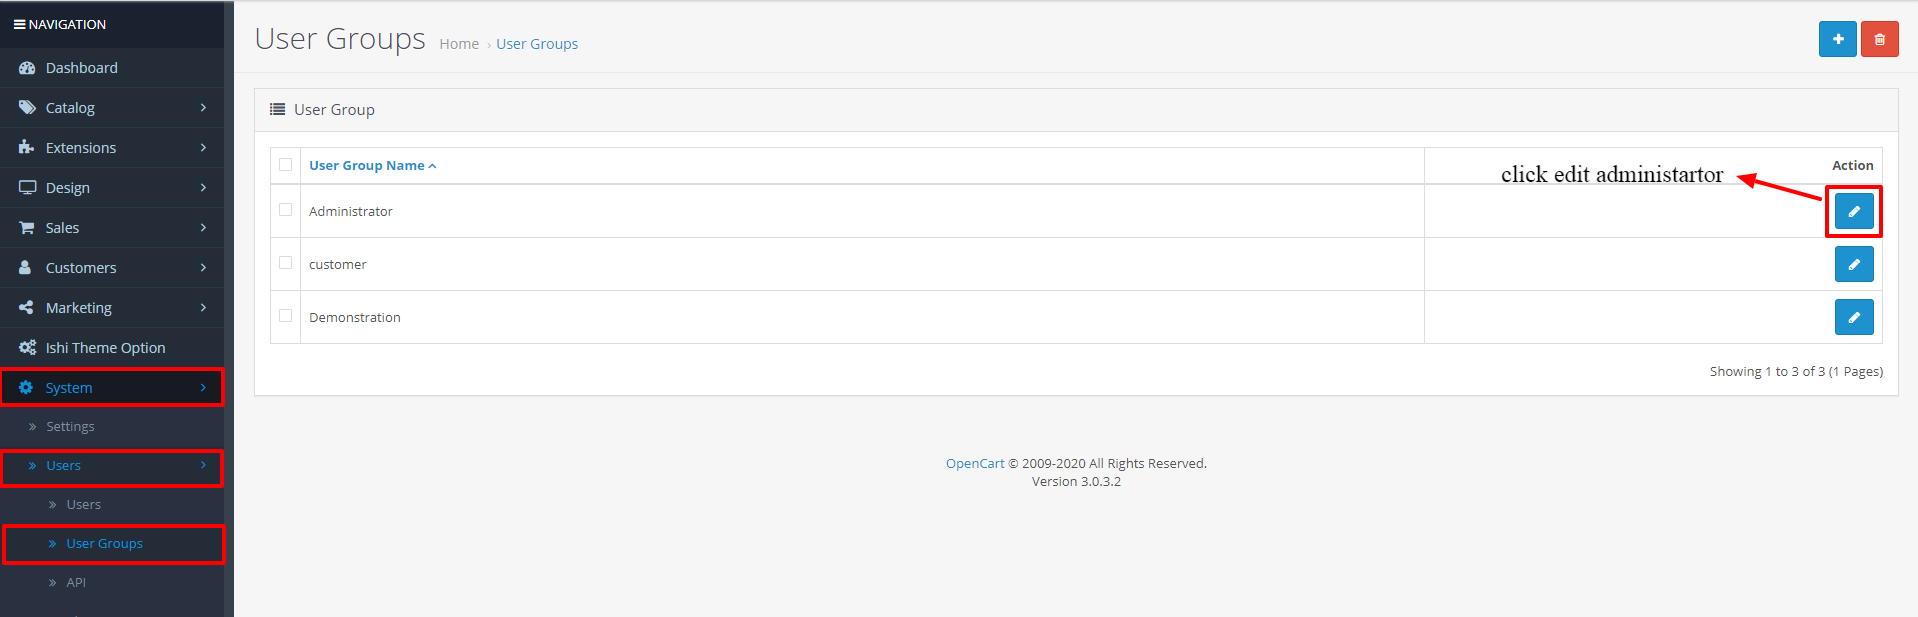
- Next, go to System -> Users -> Usergroup and edit ‘Administrator’ to provide administrator permissions to the extension.
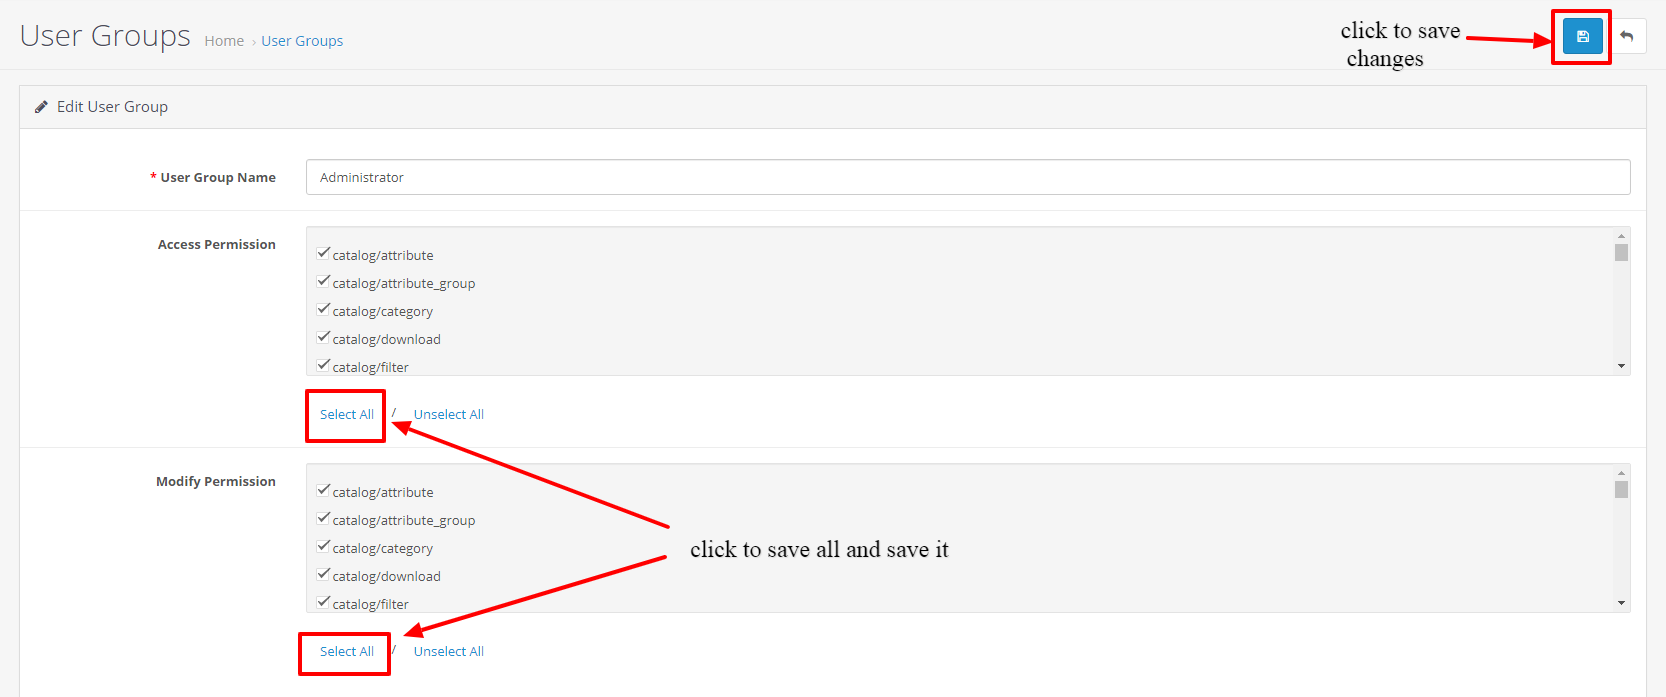
- Click on select all for both Access Permission and Modify Permission and save it.
- After this step, you will be able to see the Advanced Opencart Import Export Tool Tab in the left sidebar.
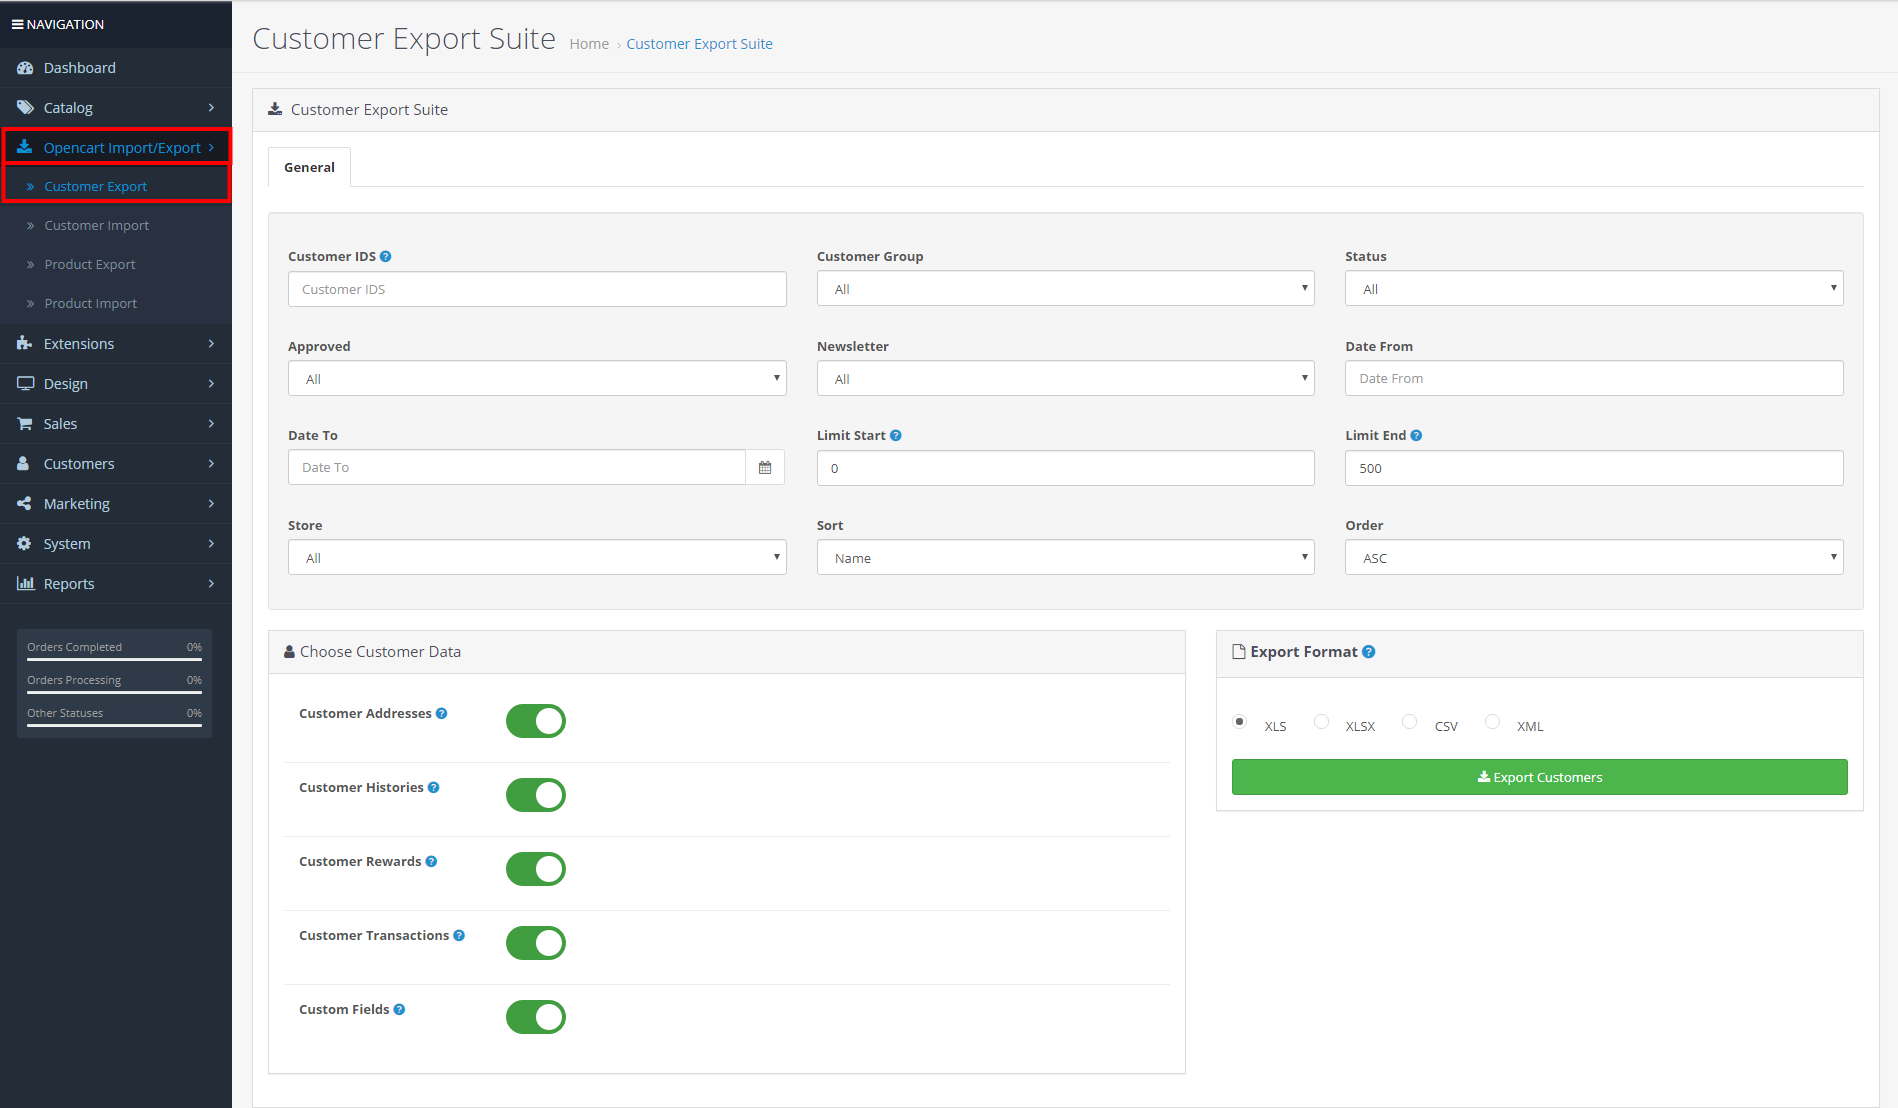
- Customer IDS: Filter Multiple Customers IDS (Comma Seperated) I.e: 100,101 (Within Range) I.e: 50 - 60. Both I.e: 50-60, 70-80, 100, 101
- Customer Group: Group wise export customer.
- Status: If status is "enabled", customers who are enabled will be exported else the disabled customers will be exported. Selecting "All" will export both enabled and disabled customers.
- Approved: If Yes, customers who have been approved by the admin will be exported else the customers who haven't been approved will be exported. Selecting "All" will export both approved and unapproved customers.
- Newsletter: If status is "enabled", customers who have subscribed to the newsletter will be exported else unsubscribed customers will be exported. Selecting "All" will export both subscribed and unsubscribed customers.
- Date From: Set the start date interval of customer registration. It is mostly useful when you want to export customers for a specific interval.
- Date To: Set the end date interval of customer registration.
- Limit Start: Set Range Of Customer Limit. If Minimum Customer Limit Not Given But Maximum Given Than Customer Limit Export From 0 To Maximum Given.if Maximum Customer Limit Not Given But Minimum Given Than Customer Limit Export From Minimum Given To Unlimited. If Not Both Maximum And Minimum Not Given, Customer Limit Will Be Ignored.
- Limit End: Set Range Of Customer Limit. If Minimum Customer Limit Not Given But Maximum Given Than Customer Limit Export From 0 To Maximum Given.if Maximum Customer Limit Not Given But Minimum Given Than Customer Limit Export From Minimum Given To Unlimited. If Not Both Maximum And Minimum Not Given, Customer Limit Will Be Ignored.
- Store: Select the store from a list of available store from where customers needs to be exported. Selecting "All" will export customers from all the stores.
- Sort: Select sort field by which customers must be sorted.
- Order: Select order of sort. Available options are Ascending and Descending.
- Customer Addresses: Select Yes if you want to Export Customer Address.
- Customer Histories: Select Yes if you want to Export Customer Histories.
- Customer Rewards: Select Yes if you want to Export Customer Rewards.
- Customer Transactions: Select Yes if you want to Export Customer Transactions.
- Custom Fields: Select Yes if you want to Export custom fields provided by opencart.
- Export Format: Select Format In Which You Want To Export Customers.
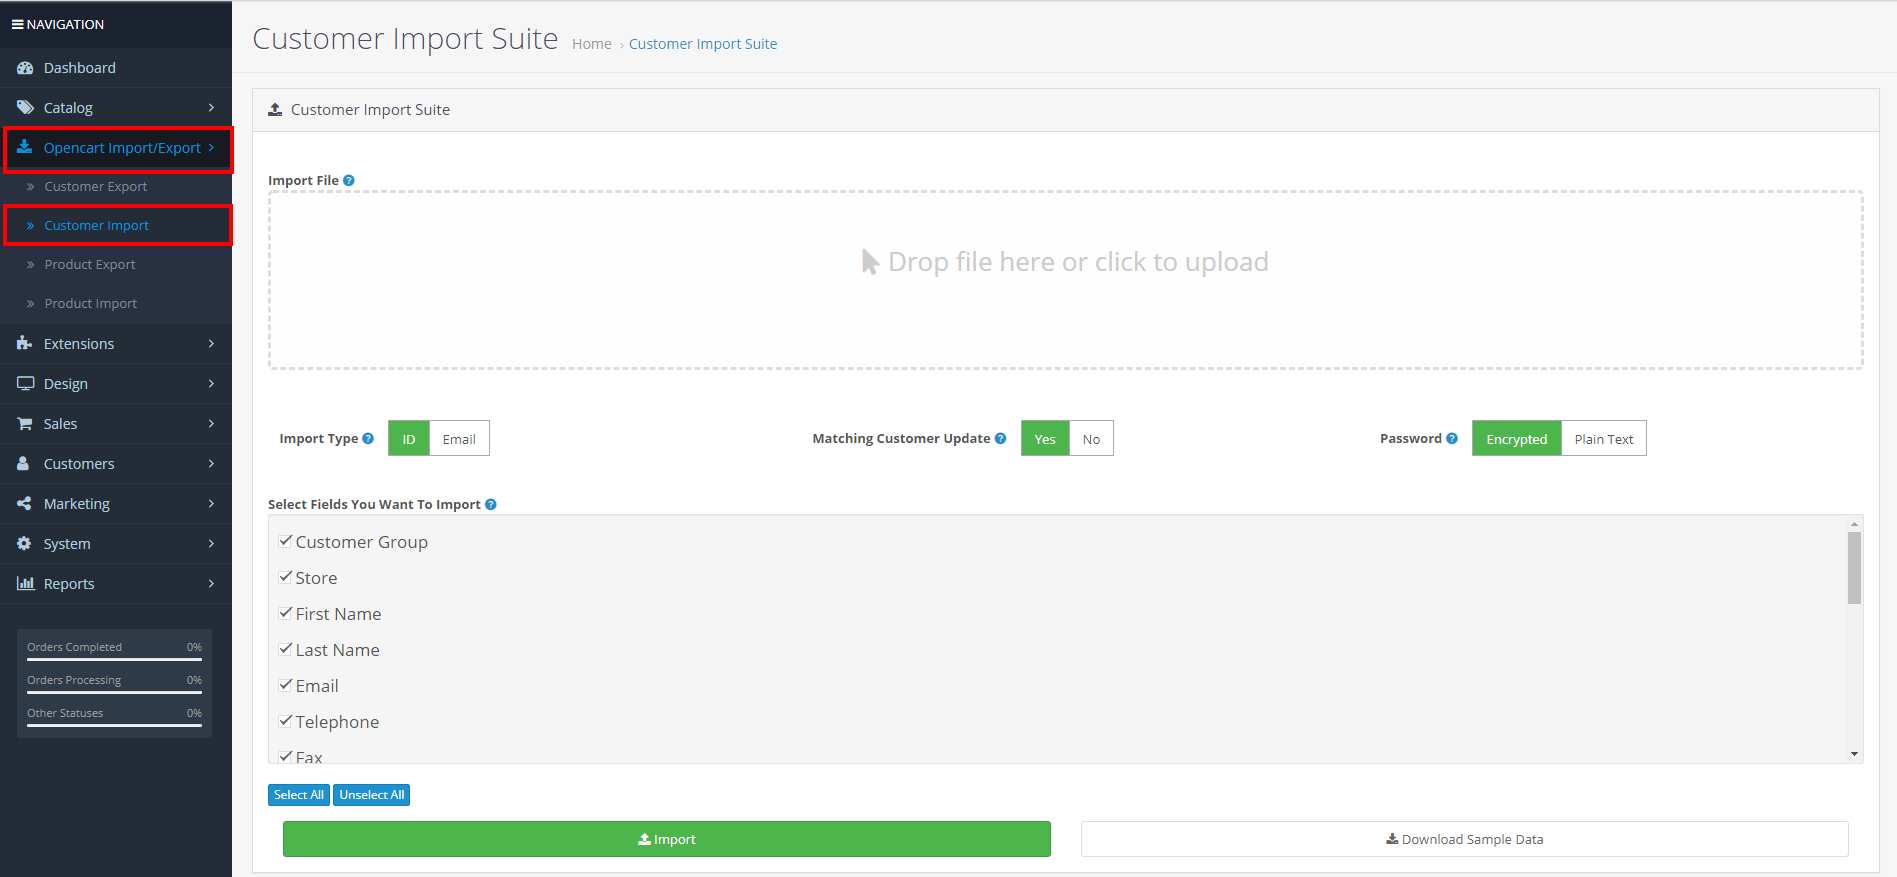
- Import File: Drag And Drop File Or Click Any Where In Drop Area To Upload (XLS, XLSX, CSV) File.
- Import Type: Unique Column For Customer Customer ID or Email.
- Matching Customer Update: Select Yes If Want To Update Existing Customers. Note: If Select No And Matching Customer Founds Then System Keep Existing Customer.
- Password: Select Password Format Which used in xls sheet.
- Select Fields You Want To Import:Check Which Fields Do You Want To Import? Unchecked Fields Will Ignored While Importing Data.
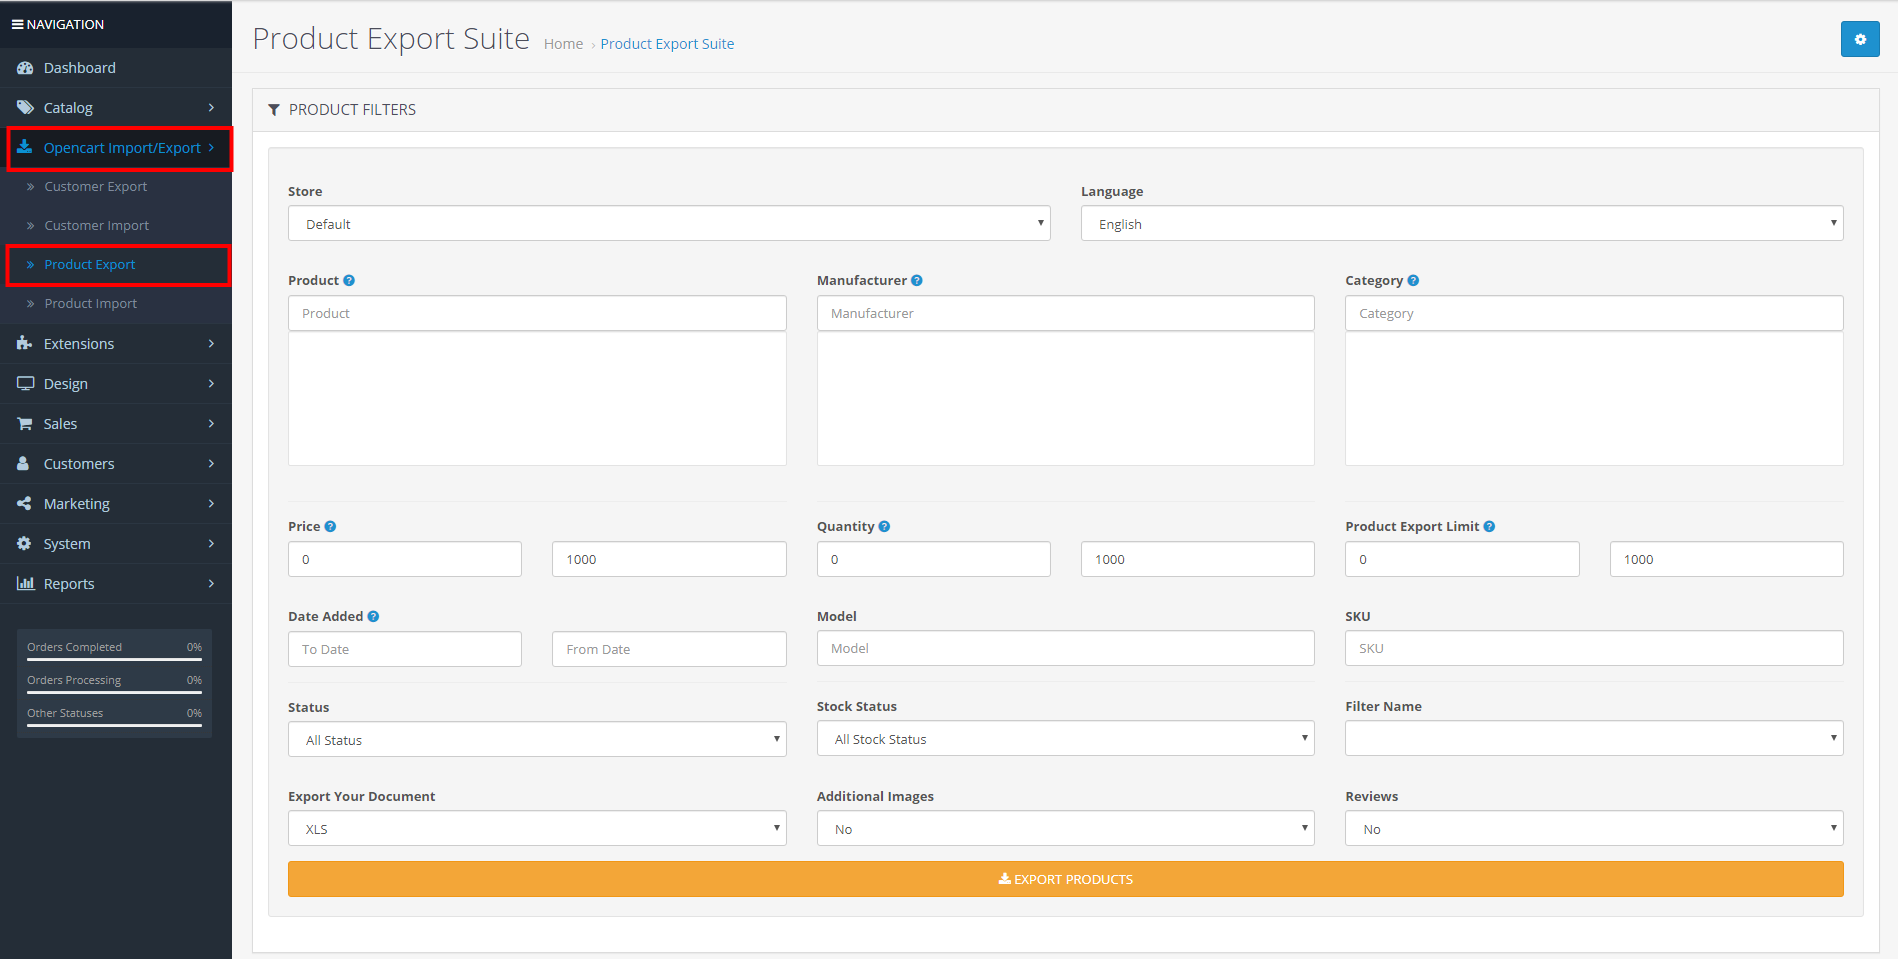
- Store:Select the store from a list of available store from where Products needs to be exported. Selecting "All" will export Products from all the stores.
- Language: Select the language in which products must be exported.
- Product: Select product you want export from all products
- Manufacturer: Configure the manufacturer list.Products which are linked to these manufacturers will be exported.
- Category: Configure the category list.Products which are linked to these categories will be exported.
- Price:Set range of price. If minimum price not given but maximum given than price export from 0 to maximum given.If maximum price not given but minimum given than price export from minimum given to unlimited. If not both maximum and minimum not given, price will ignored.
- Quantity:Set range of quantity. If minimum quantity not given but maximum given than quantity export from 0 to maximum given.If maximum quantity not given but minimum given than quantity export from minimum given to unlimited. If not both maximum and minimum not given, quantity will ignored.
- Product Export Limit:Set range of product limit. If minimum product limit not given but maximum given than product limit export from 0 to maximum given.If maximum product limit not given but minimum given than product limit export from minimum given to unlimited. If not both maximum and minimum not given, product limit will ignored.
- Date From: Set the start date interval of product create. It is mostly useful when you want to export products for a specific interval.
- Date To: Set the end date interval of product create.
- Model: Configure the Model number of the product.The products that matches to configured Model number will be exported.
- SKU: Configure the SKU of the product.The products that matches to configured SKU will be exported.
- Status: If status is "enabled", products whose status is enabled will be exported else the disabled products will be exported. Selecting "All" will export both enabled and disabled products.
- Stock Status: Products whose stock status matches which the selected value will be exported.
- Filter Name: Products whose filter name matches which the selected value will be exported.
- Export Your Document: Select Format In Which You Want To Export Products.
- Additional Images: Select yes if you want to export addtional images of the products, otherwise only primary image will be exported.
- Reviews: Select yes if you want to export reviews of the products, otherwise reviews will not be exported.
Choose Fields you want to export
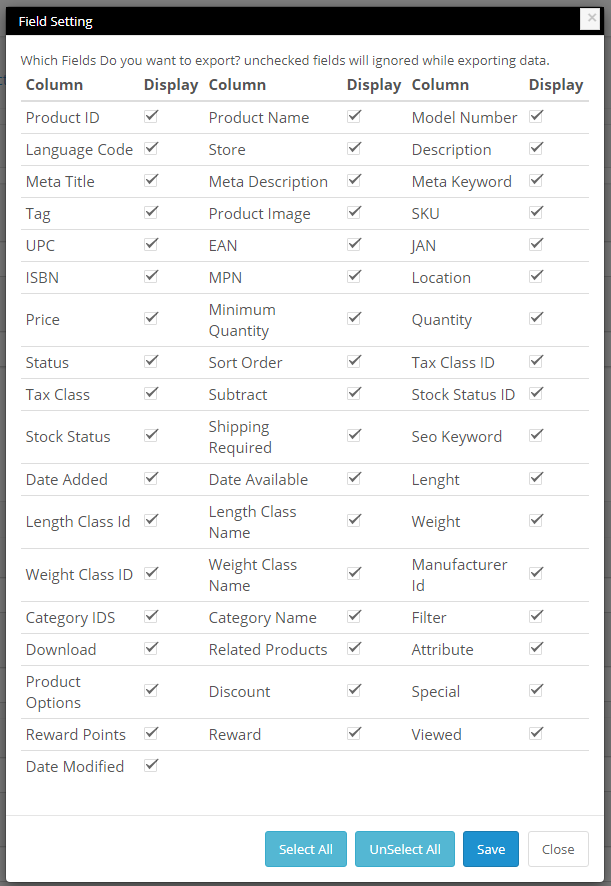
- Product ID: Select Yes If Want To Export Product ID
- Product Name: Select Yes If Want To Export Product Name
- Model Number: Select Yes If Want To Export Model Number
- Language Code: Select Yes If Want To Export Language Code
- Store: Select Yes If Want To Export Store
- Description: Select Yes If Want To Export Description
- Meta Title: Select Yes If Want To Export Meta Title
- Meta Description: Select Yes If Want To Export Meta Description
- Meta Keyword: Select Yes If Want To Export Meta Keyword
- Tag: Select Yes If Want To Export Tag
- Product Image: Select Yes If Want To Export Product Image
- SKU: Select Yes If Want To Export SKU
- UPC: Select Yes If Want To Export UPC
- EAN: Select Yes If Want To Export EAN
- JAN: Select Yes If Want To Export JAN
- ISBN: Select Yes If Want To Export ISBN
- MPN: Select Yes If Want To Export MPN
- Location: Select Yes If Want To Export Location
- Price: Select Yes If Want To Export Price
- Minimum Quantity: Select Yes If Want To Export Minimum Quantity
- Quantity: Select Yes If Want To Export Quantity
- Status: Select Yes If Want To Export Status
- Sort Order: Select Yes If Want To Export Sort Order
- Tax Class ID: Select Yes If Want To Export Tax Class ID
- Tax Class: Select Yes If Want To Export Tax Class
- Subtract: Select Yes If Want To Export Subtract
- Stock Status ID: Select Yes If Want To Export Stock Status ID
- Stock Status: Select Yes If Want To Export Stock Status
- Shipping Required: Select Yes If Want To Export Shipping Required
- Seo Keyword: Select Yes If Want To Export Seo Keyword
- Date Added: Select Yes If Want To Export Date Added
- Date Available: Select Yes If Want To Export Date Available
- Lenght: Select Yes If Want To Export Lenght
- Length Class Id: Select Yes If Want To Export Length Class Id
- Length Class Name: Select Yes If Want To Export Length Class Name
- Weight: Select Yes If Want To Export Weight
- Weight Class ID: Select Yes If Want To Export Weight Class ID
- Weight Class Name: Select Yes If Want To Export Weight Class Name
- Manufacturer Id: Select Yes If Want To Export Manufacturer Id
- Category IDS: Select Yes If Want To Export Category IDS
- Category Name: Select Yes If Want To Export Category Name
- Filter: Select Yes If Want To Export Filter
- Download: Select Yes If Want To Export Download
- Related Products: Select Yes If Want To Export Related Products
- Attribute: Select Yes If Want To Export Attribute
- Product Options: Select Yes If Want To Export Product Options
- Discount: Select Yes If Want To Export Discount
- Special: Select Yes If Want To Export Special
- Reward Points: Select Yes If Want To Export Reward Points
- Reward: Select Yes If Want To Export Reward
- Viewed: Select Yes If Want To Export Viewed
- Date Modified: Select Yes If Want To Export Date Modified
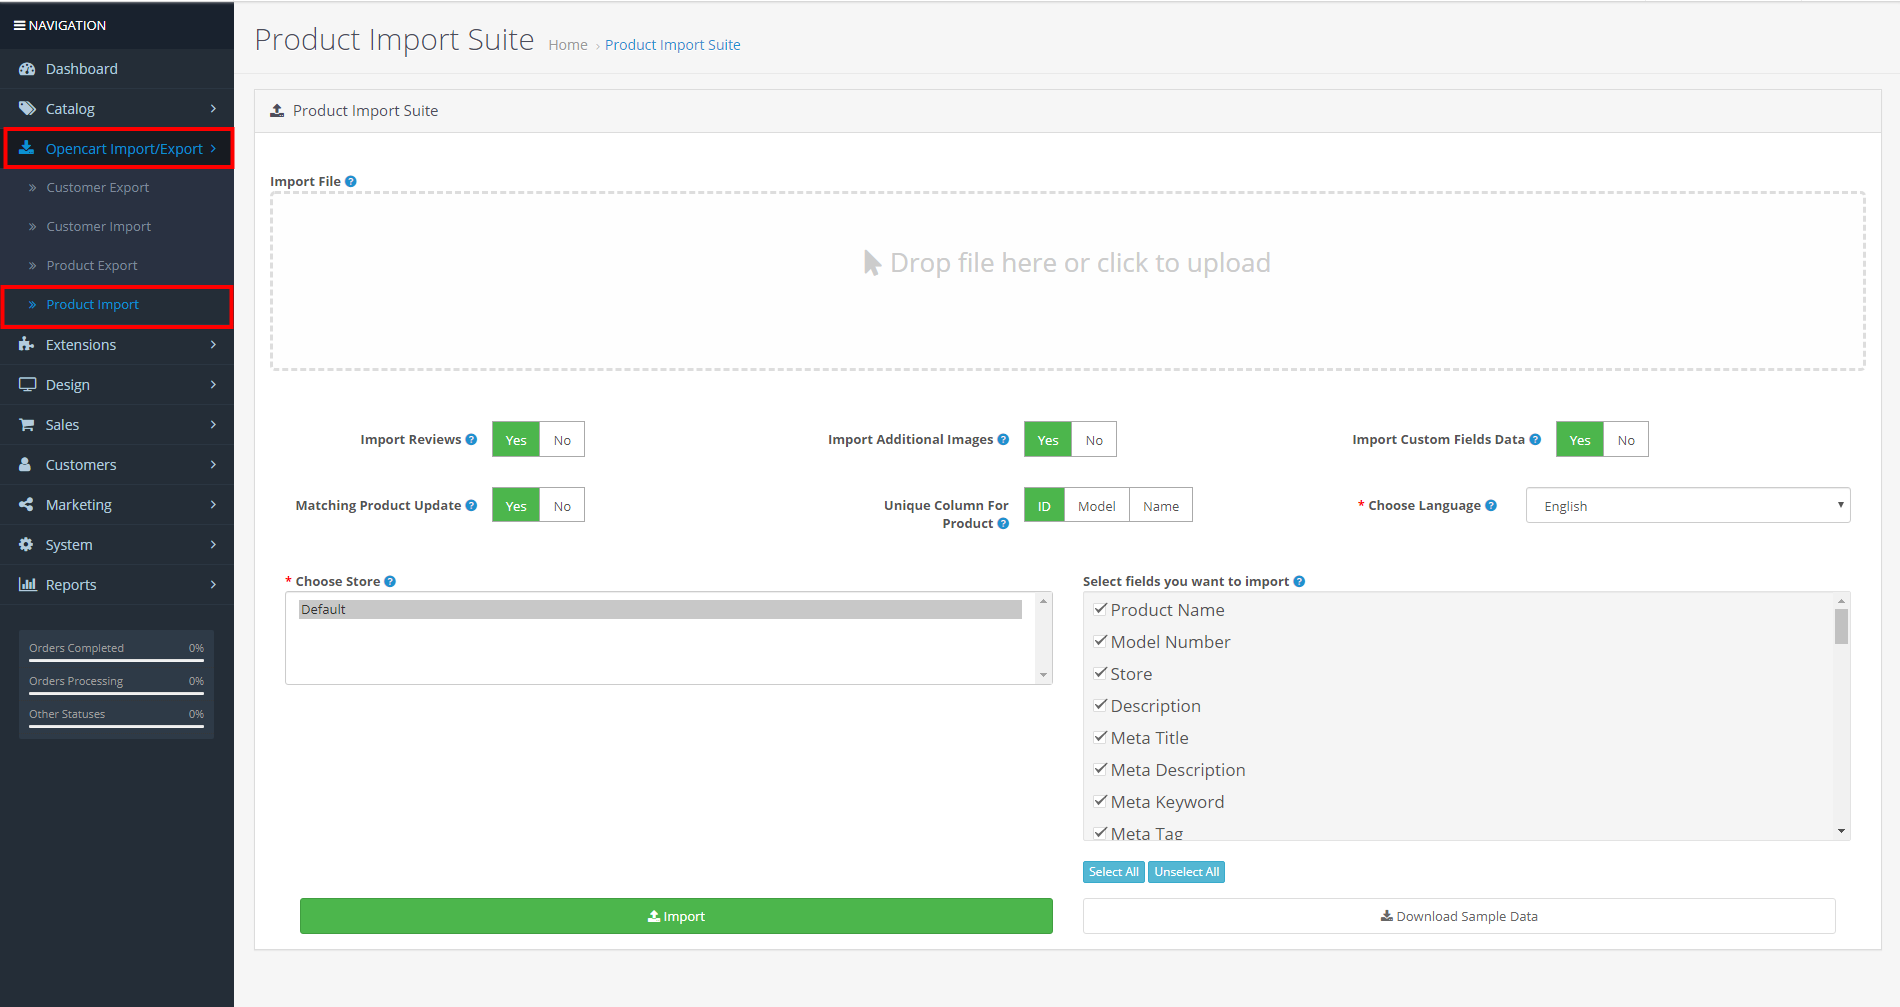
- Import File: Drag And Drop File Or Click Any Where In Drop Area To Upload (XLS, XLSX, CSV) File.
- Import Reviews: Select Import Review Yes To Import Reviews Of Products.
- Import Additional Images: If Select Yes Then Additional Images import.Note: If Select No Then Additional Images not import.
- Import Custom Fields Data: Import Custom Fields Data To 'product, product_description' Tables Only.
- Matching Product Update :Select Yes If Want To Update Existing Products. Note: If Select No And Matching Product Found Then System Keep Existing Product.
- Unique Column For Product:Unique Column For Product (if choose ID then id have unique on product table)
- Choose Language:Select Language In Which Import Data Will Be Imported.
- Choose Store:Select Store In Which Import Data Will Be Imported.
- Select Fields You Want To Import:Check Which Fields Do You Want To Import? Unchecked Fields Will Ignored While Importing Data.