Advanced Social Login Opencart Plugin Documentation
Author : ISHI THEMES
Created : 23
November 2019
Thank you! We are glad that you have choosen us.
Social Login is our enhanced and beautifully designed responsive Opencart theme for your Social Login online stores. Social Login is rich with powerful userfriendly features that would attract more clients to your online store and boost sales!
Here are some basics on installing, configuring and customizing the theme that will get you started! This document is written very carefully by keeping mind Beginners, advanced users and developers.
If you are new to Opencart. Please read Opencart GUIDE first and then get along with the theme document.
Getting Support
In case our documentation does not serve your queries.Please feel free to contact our support team via email Here. Please be sure to include your site URL as well as your admin and FTP details when you contact our support team.Thanks so much!
Our support scope
Our Social Login covers configurations related to the theme, trouble using any features of the theme and bug fixes with the theme. We don't provide Social Login for customizations or 3rd party extensions.
Support response time
We try our best to serve our clients around the clock, however, this is not always possible due to different time zones. The team will try to reply you as fast as possible.
In case you ask for help in the weekend, you may have to wait a little bit for Social Login, please be patient.
Please rate our Plugin and keep encouraging us!
Installation Social Login Plugin
Advanced Social Login module will allow Social Login in your Opencart Store.
Basic Installation Steps
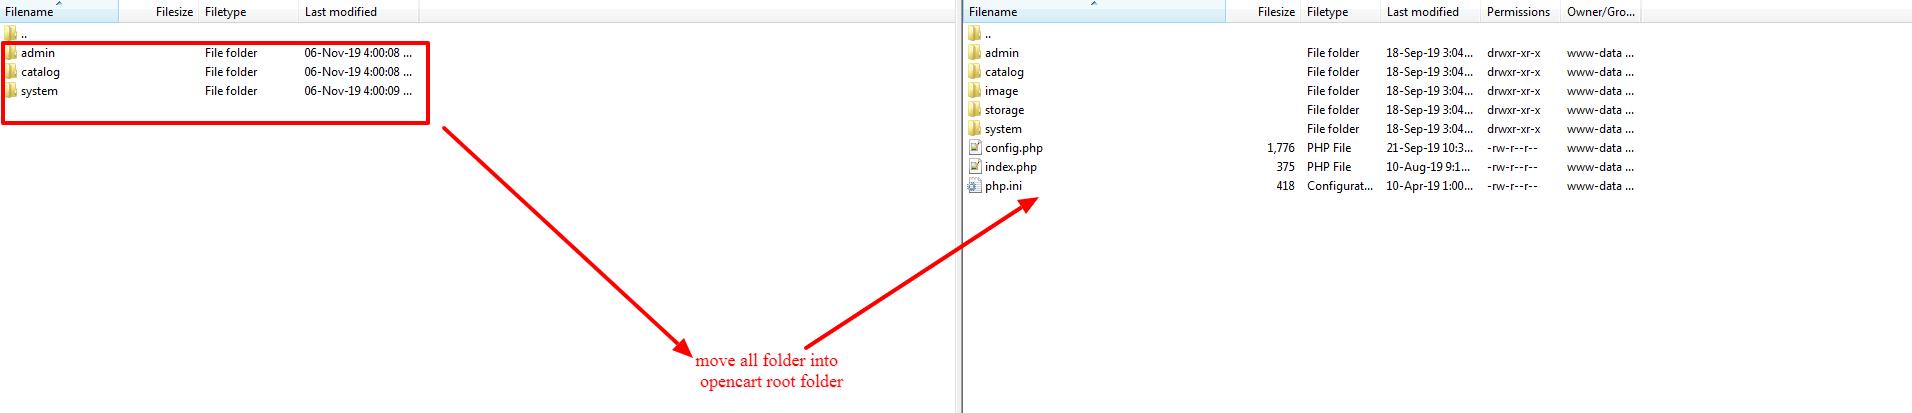
- Installation of Advanced Social Login for Opencart is very simple. After extracting the zip file, you will find folders admin, catalog, and system. Now, copy these admin and catalog and system folders into the root directory of your Opencart installation. Please view the screenshot below for better understanding.
Note : This step is applicable only for the opencart versions 3.x and above 3.x
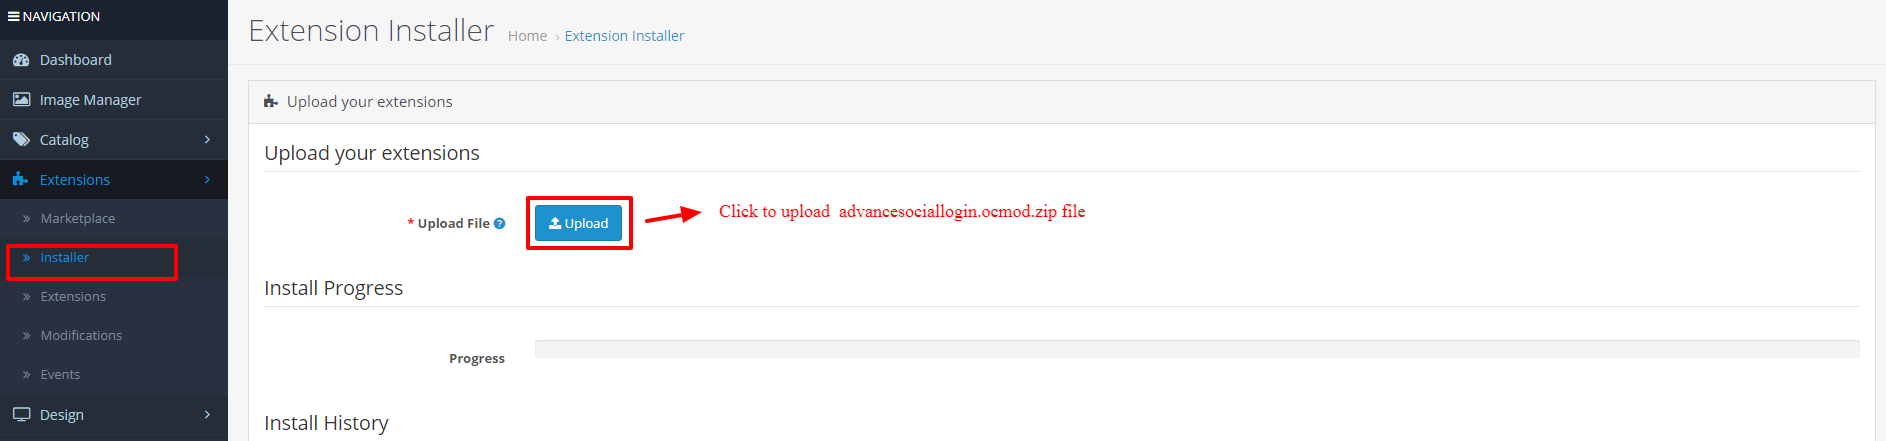
- Once you have copied the folders in the previous step, then login to admin and from the main menu go to Extensions->Extension installer and upload the ZIP file – "advancesociallogin.ocmod.zip". The ZIP file can be found root folder of the downloaded zip.
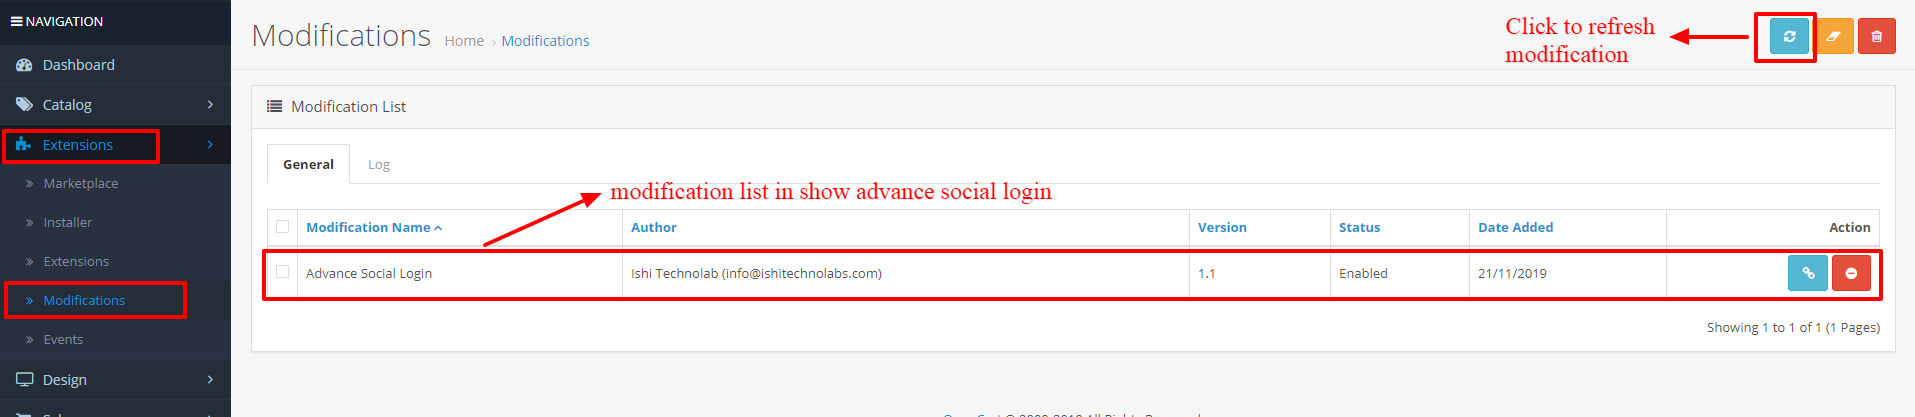
- Now, go to the Extensions > Modification and click on refresh field.
- Next, go to System -> Users -> Usergroup and edit ‘Administrator’ to provide administrator permissions to the extension.
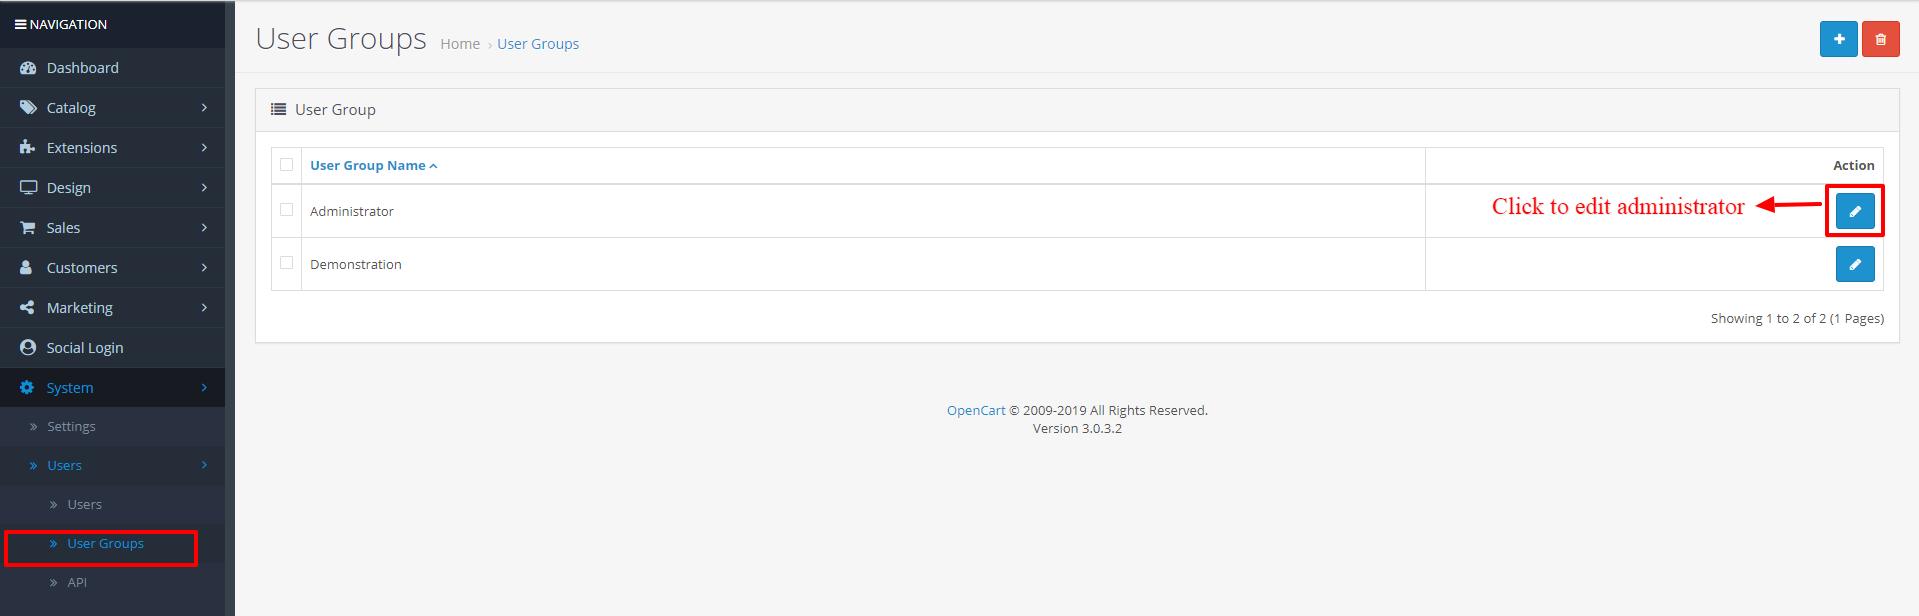
- Click on select all for both Access Permission and Modify Permission and save it.

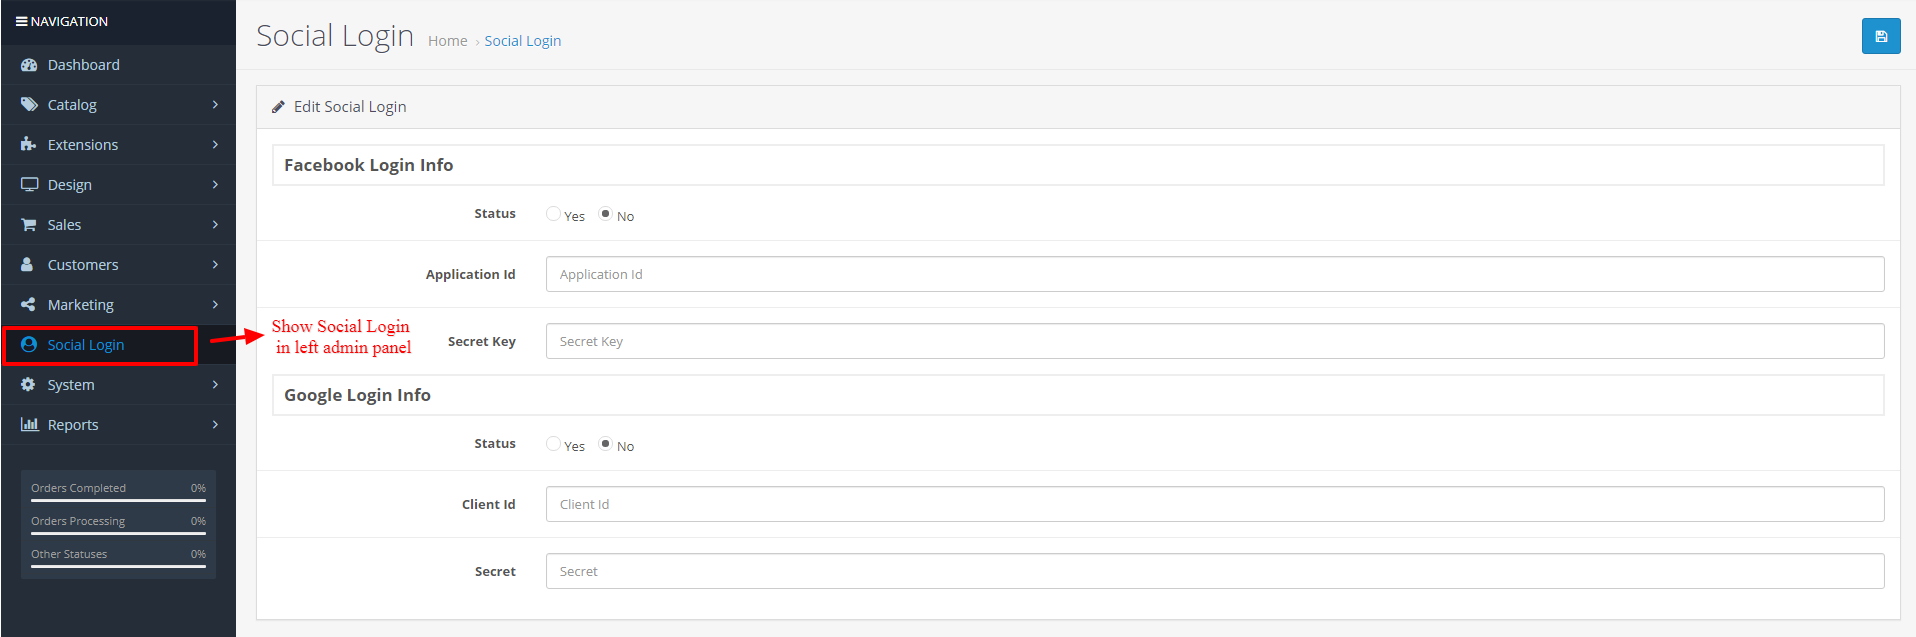
- After this step, you will be able to see the Social Login Tab in the left sidebar.
Basic Configuration Steps
The tutorial shows you a step by step setup procedure for Facebook Login and Google Login.
Note : For Facebook Login HTTPS is mandatory.
- Visit facebook developers page https://developers.facebook.com/
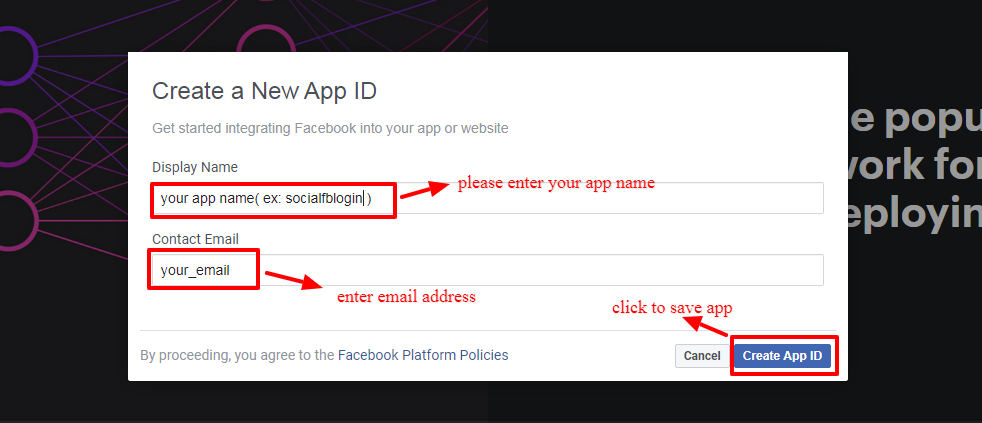
- Create new App in Facebook

- Create a new App ID
- After Creating a new App. Please go to the dashboard of your facebook developer account and click on "Setup" as shown below.
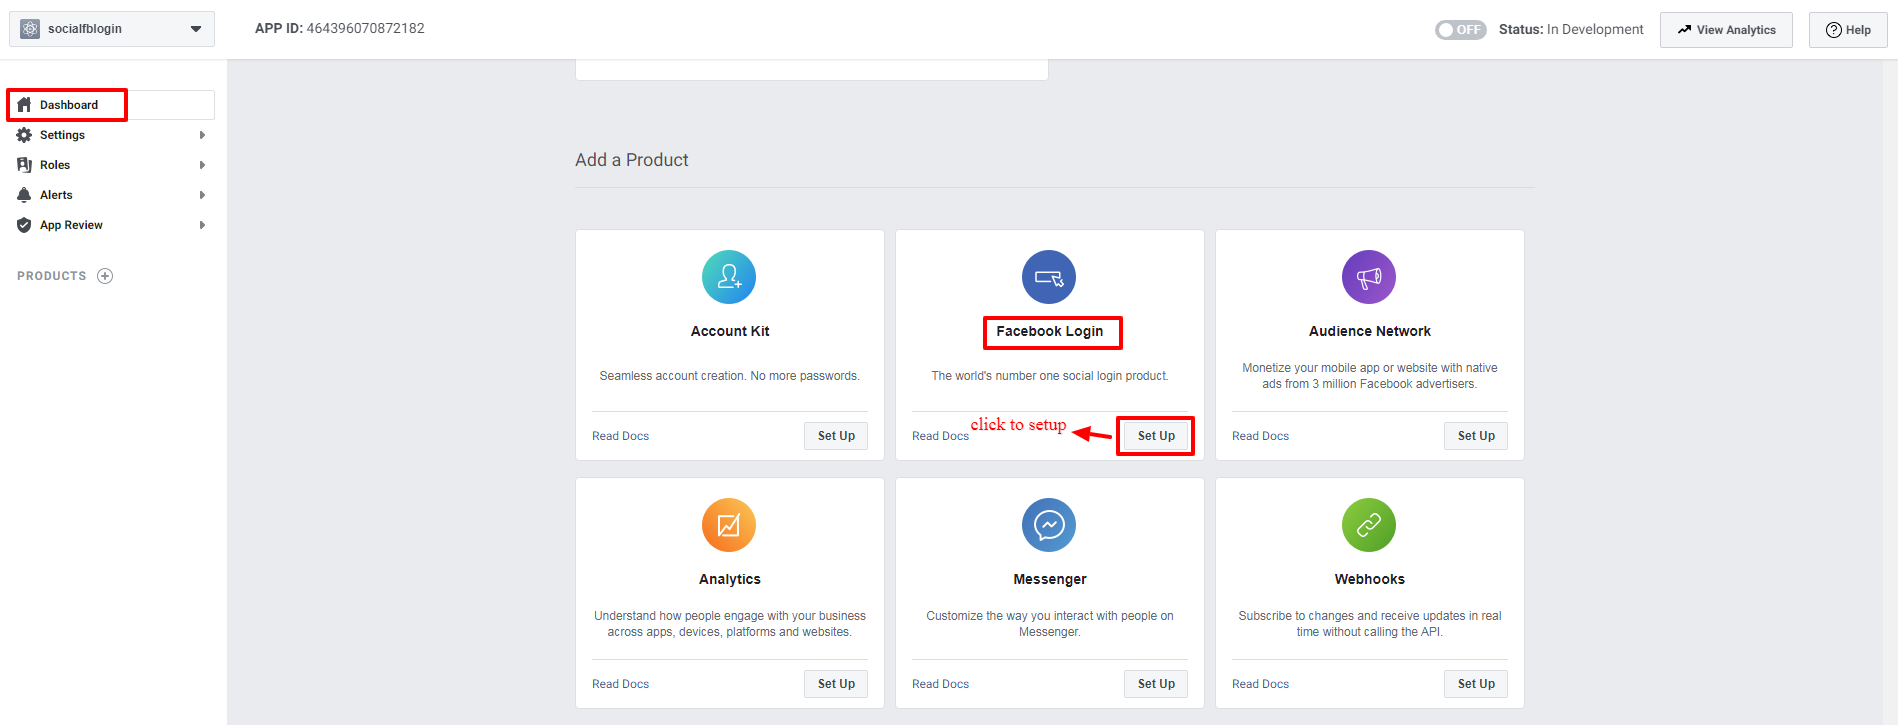
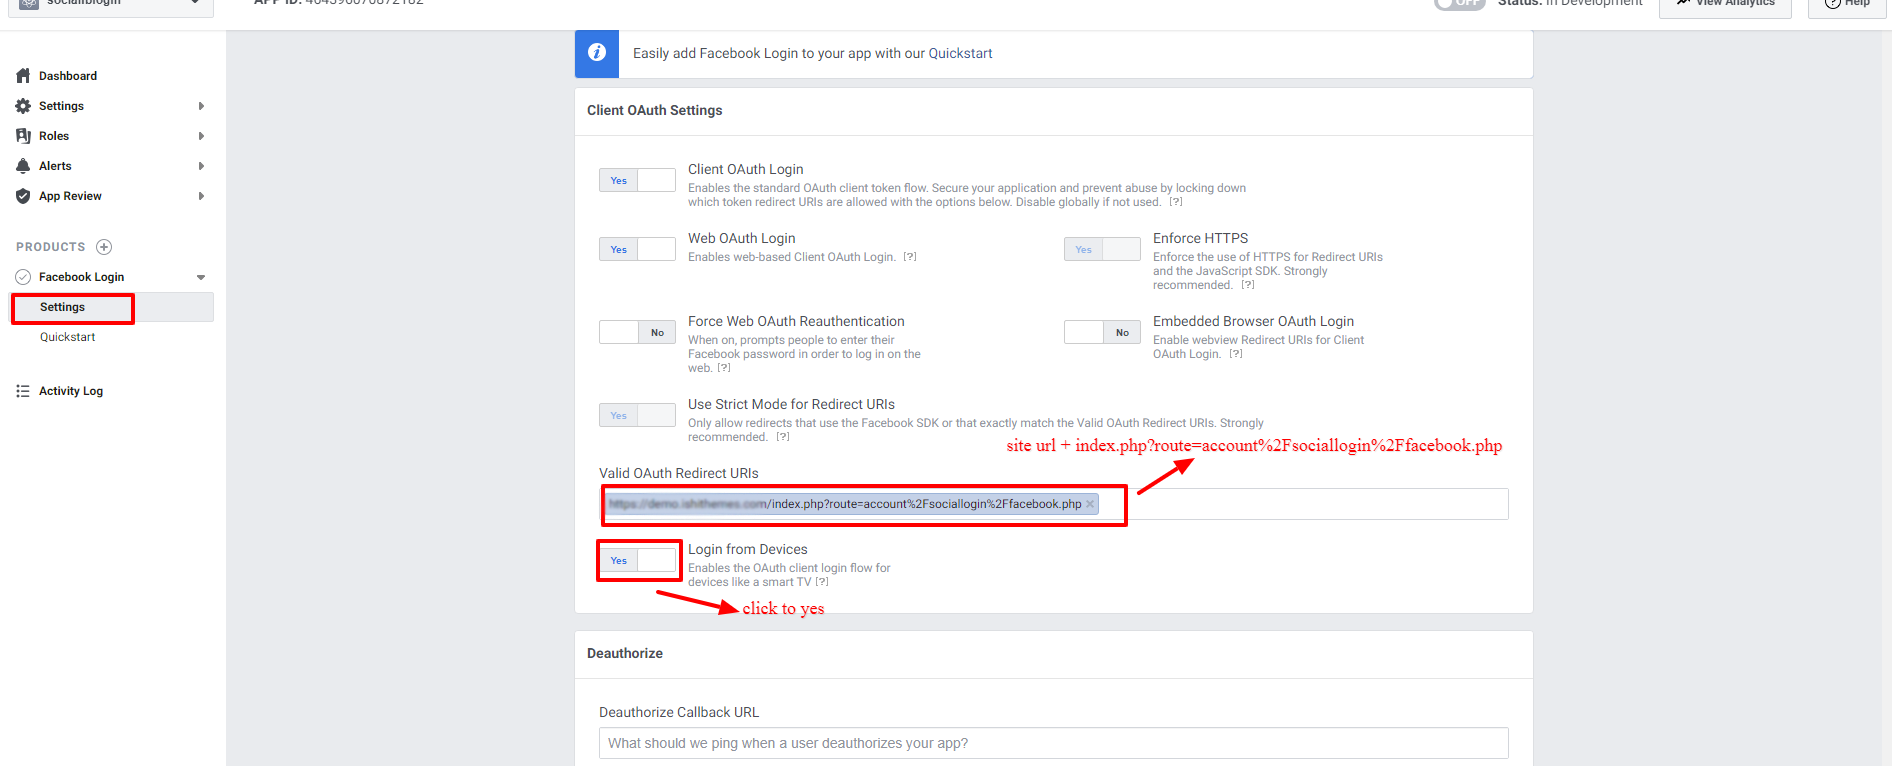
- Go to Facebook login > Settings. And Enter valid OAuth Redirect URLs.
- Note : If your store url is https://www.google.com/ then your Redirect URL should be : https://www.google.com/index.php?route=account%2Fsociallogin%2Ffacebook.php
- Note : Login From Devices Should be YES
- Now, go to setting > Basic and Configure all your basic app settings such as App Name, Logo, Privacy Policy URL and Terms Of Service URL. Save your changes and the App is ready to go live.

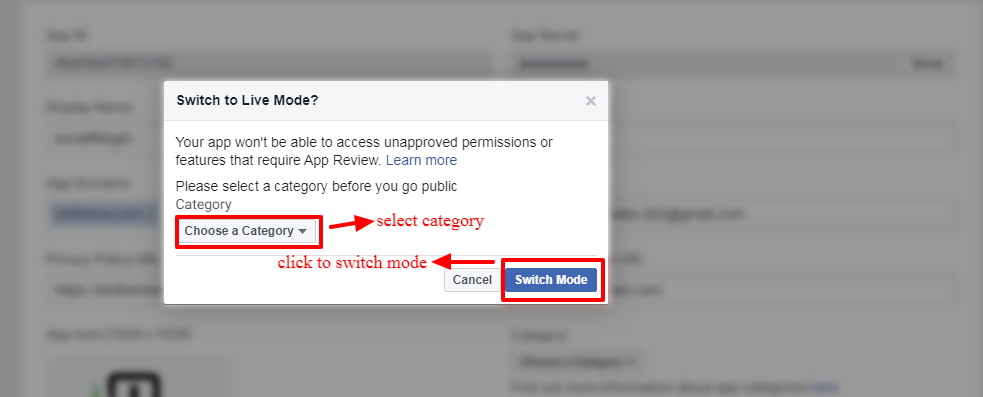
- Enable the OFF button to make the Facebook APP live.

- Select the required Category and click on Switch Mode.
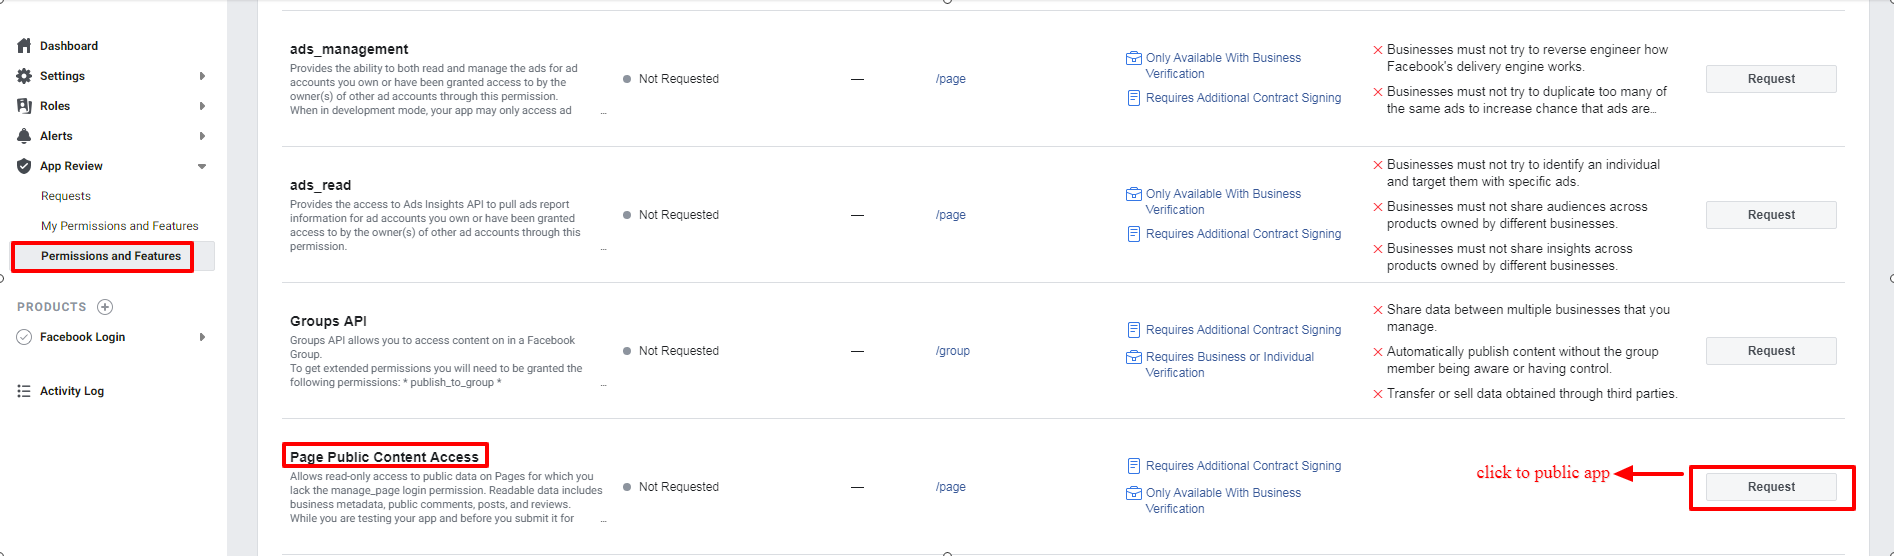
- To set your app public, Go to App review > permissions and features. Search for "Page Public Content Access" and click on Request Button.
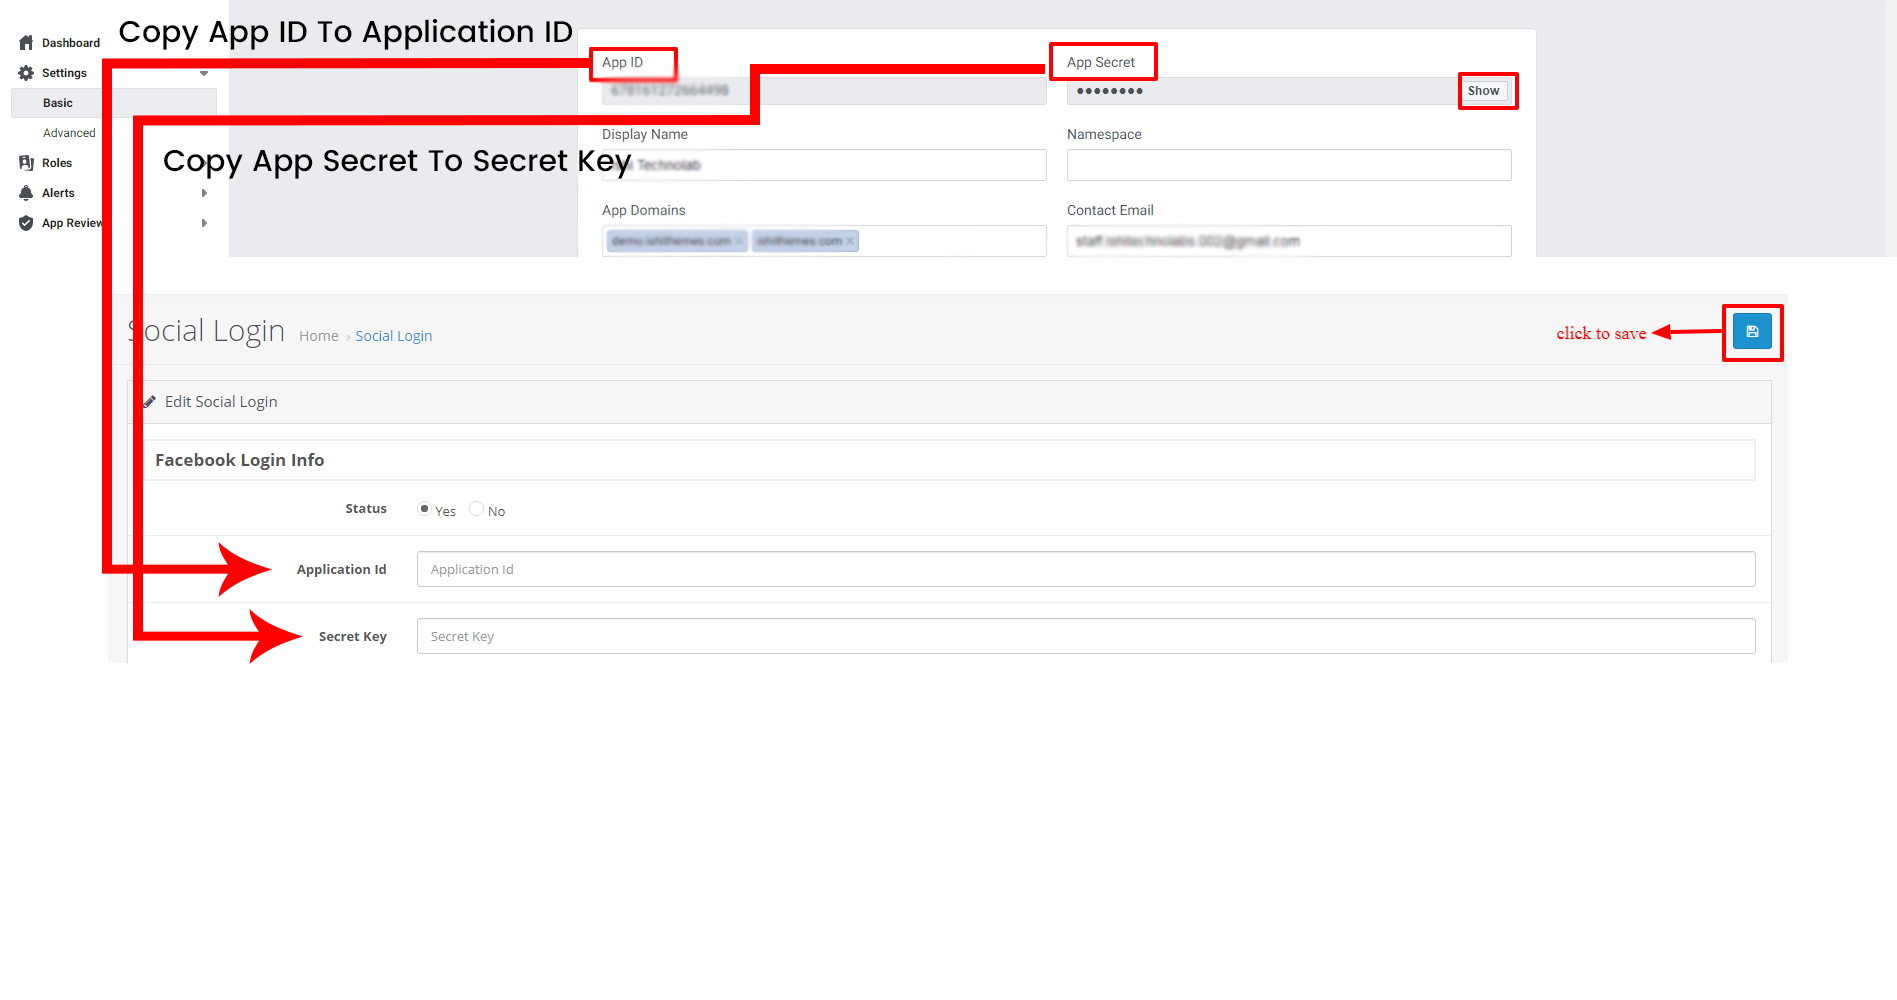
- Put App ID & App Secret from Facebook app to your Opencart Extesion. Now the extension is ready to login using Facebook!
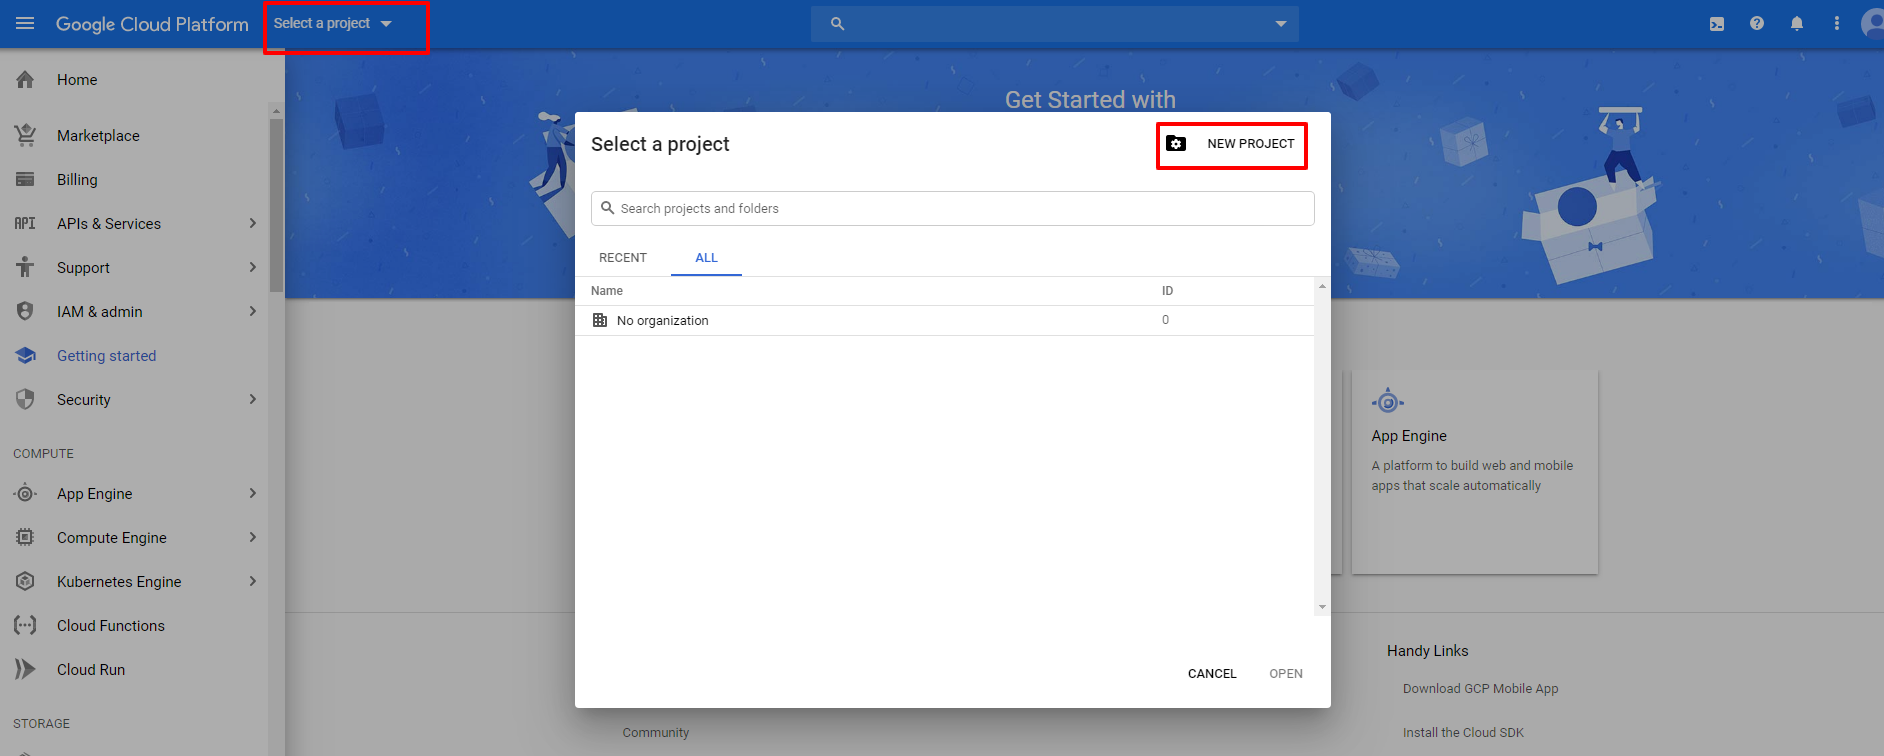
- Visit the Google Developers console https://cloud.google.com/console
- Click on Select a project from the Top bar. A popup opens from which you need to click on "New Project" as shown in the screenshot below.
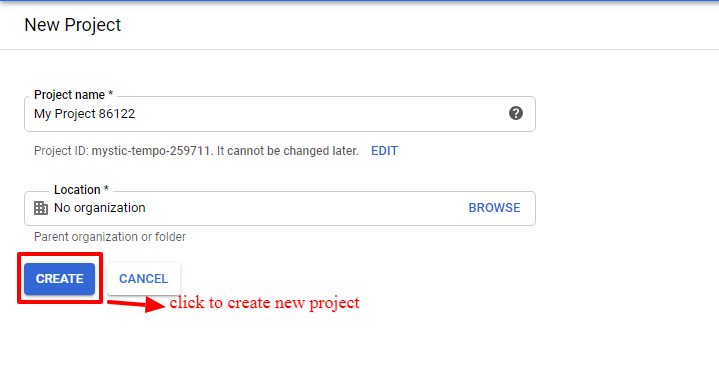
- Enter Project Name and Location as per your requirements.
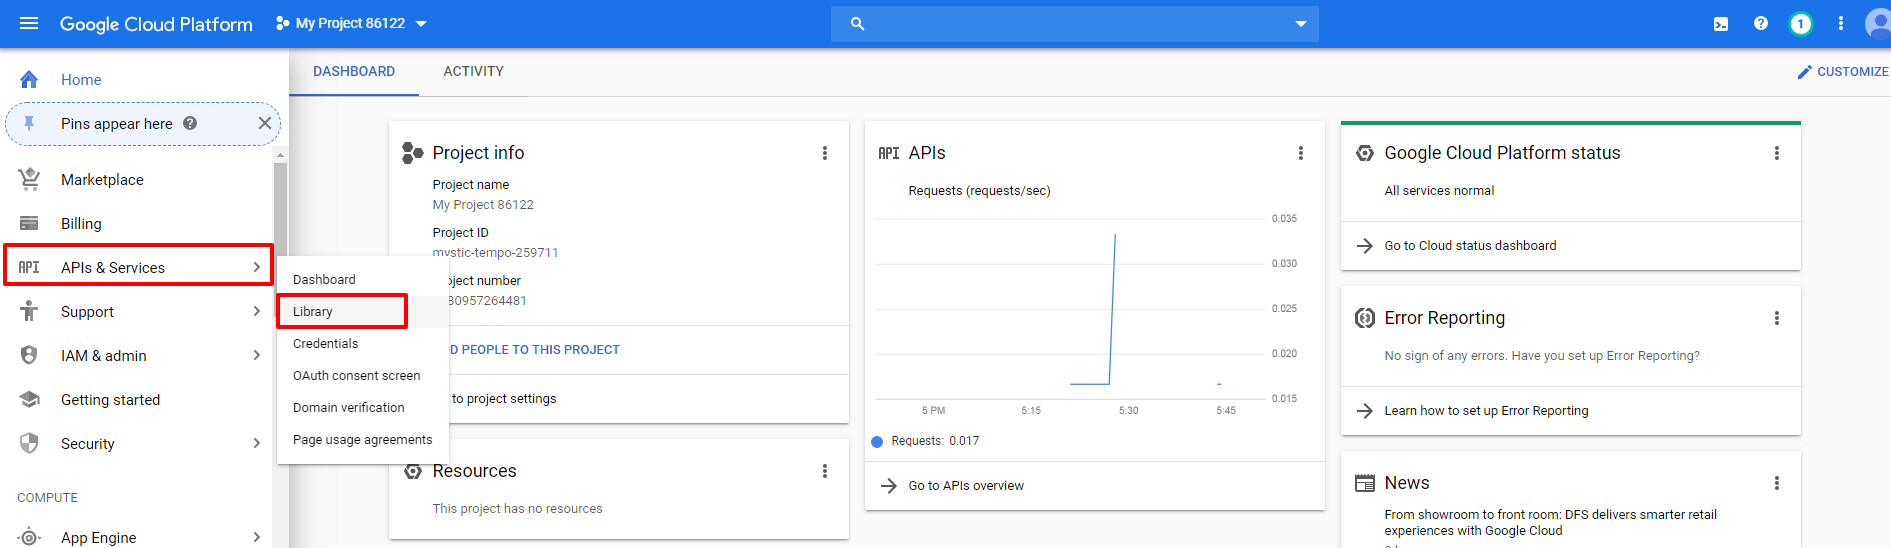
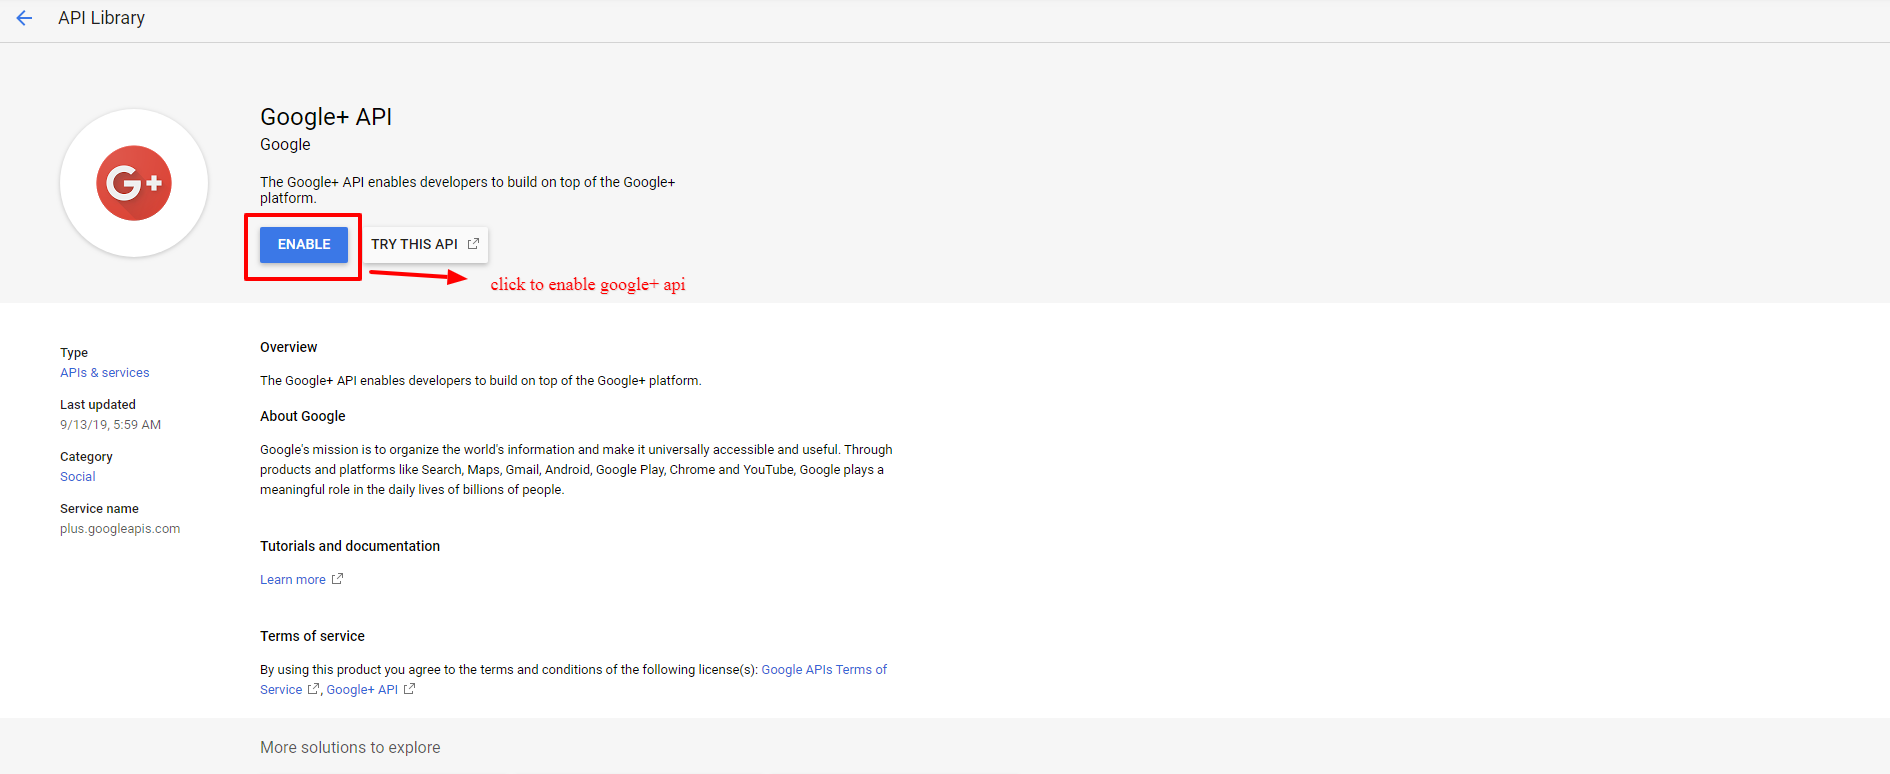
- Go to API & Services > Library
- Install google+ Library
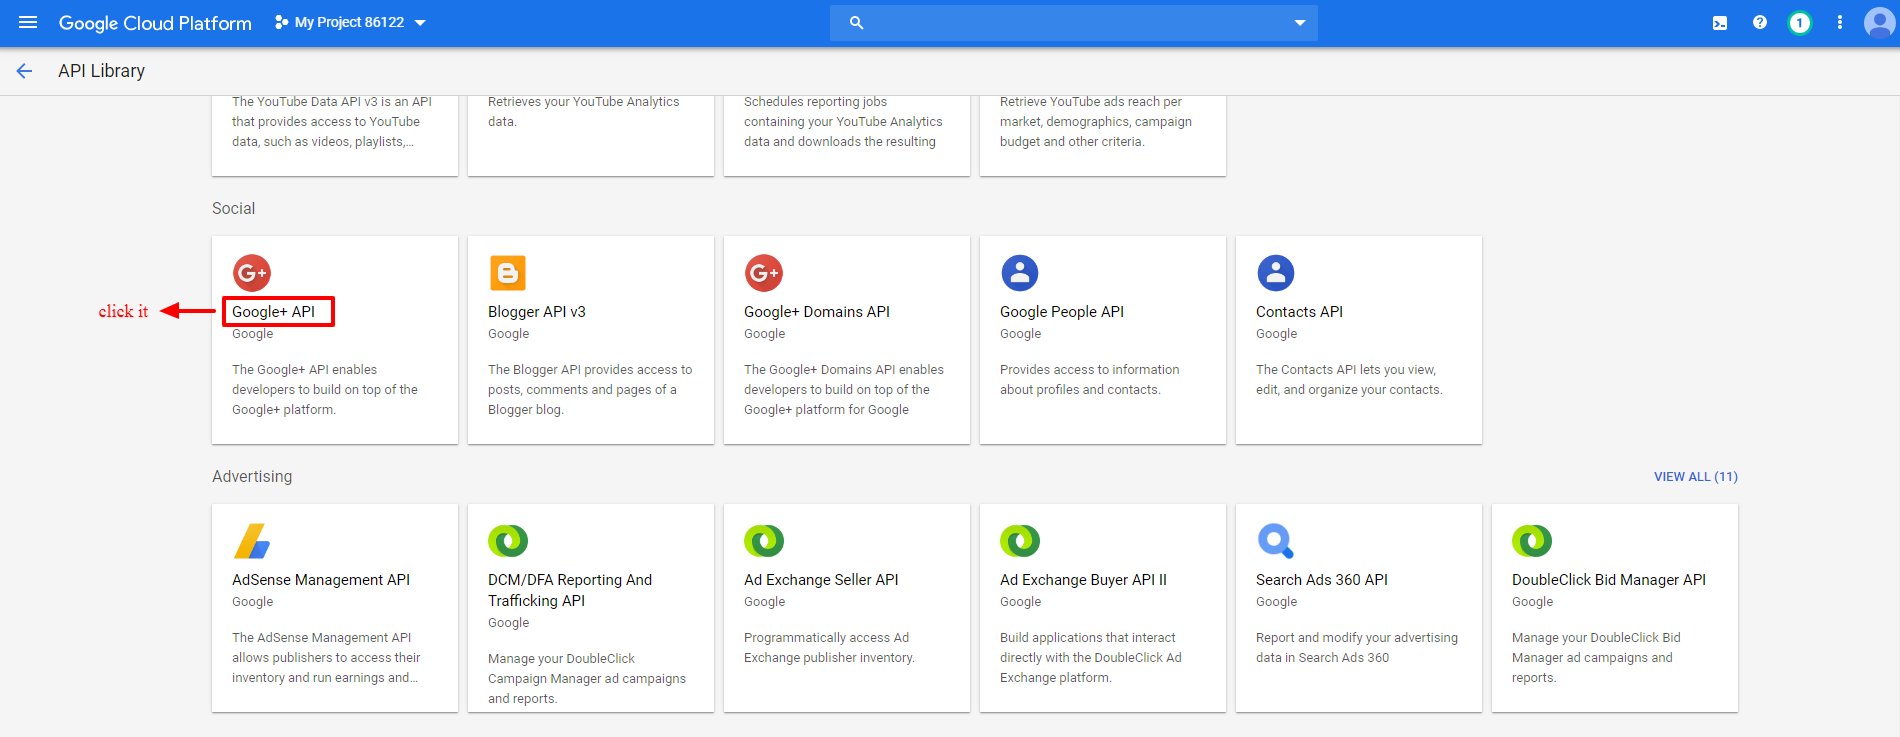
- Enable google+ library
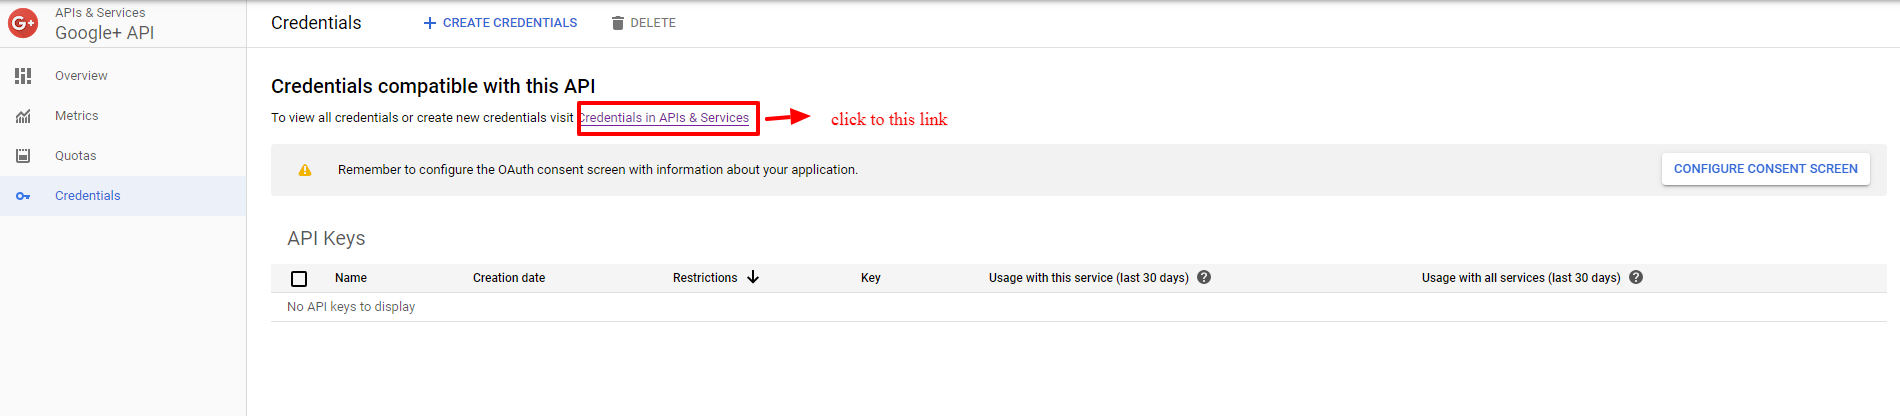
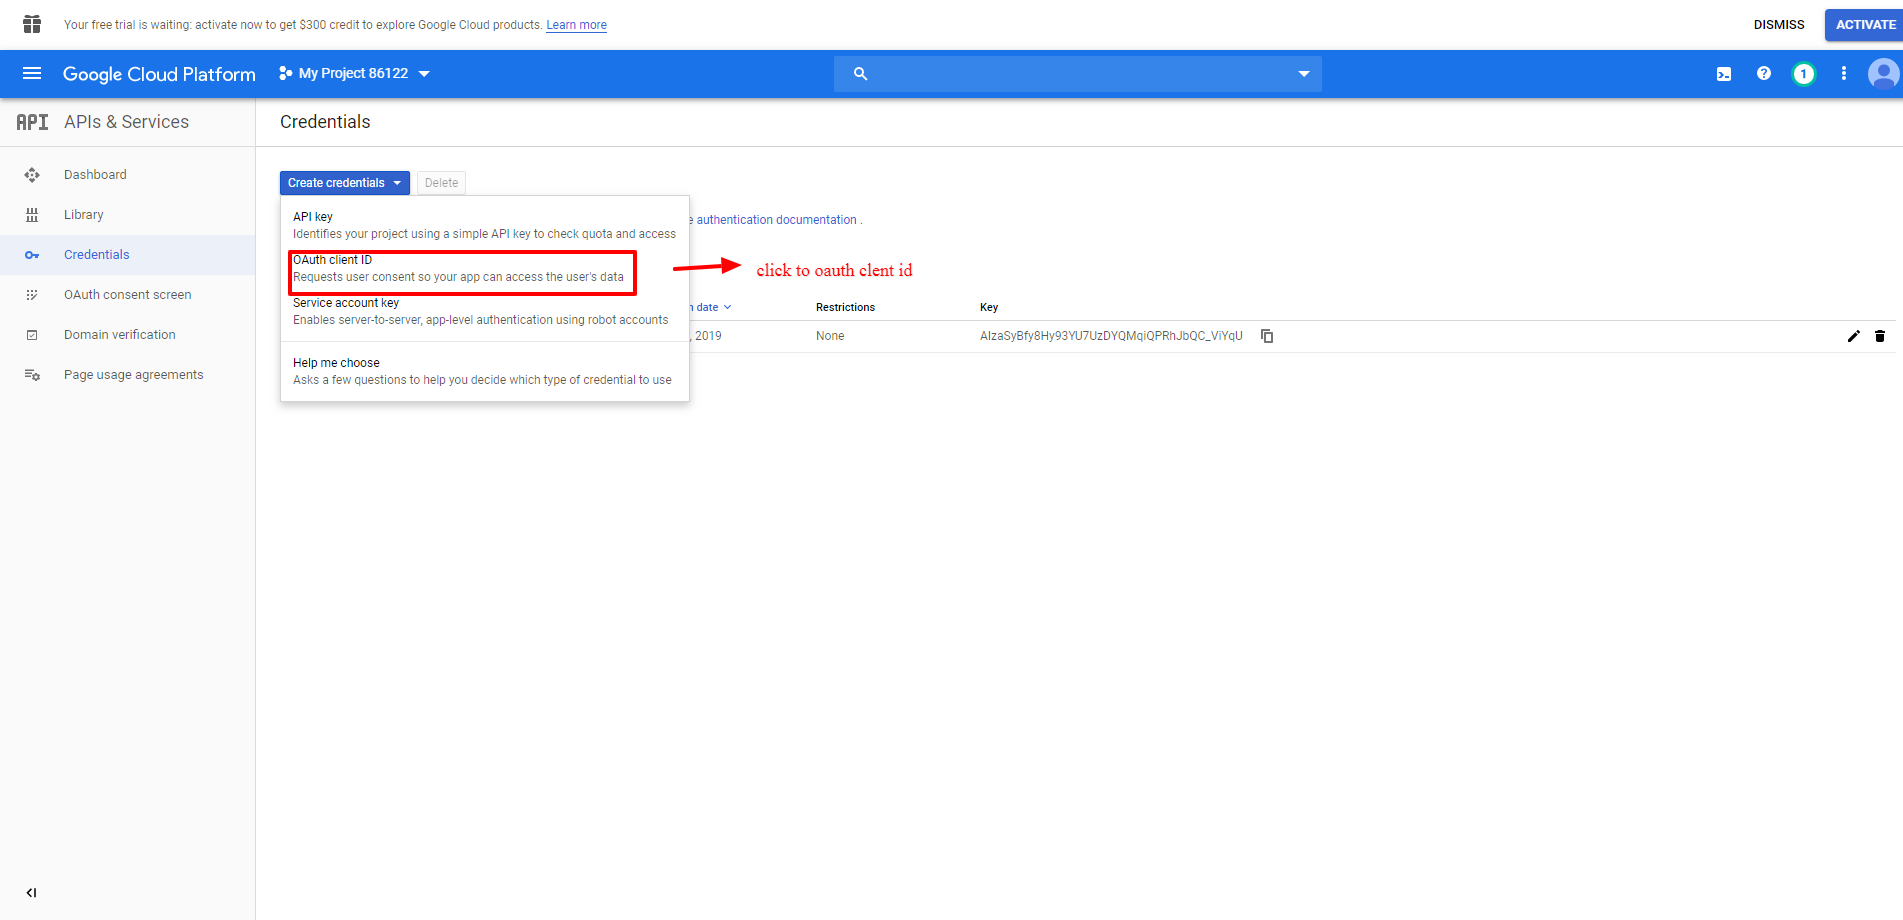
- In the Google+ API configuration, Go to Credentials > click "credentials in APIs & services"
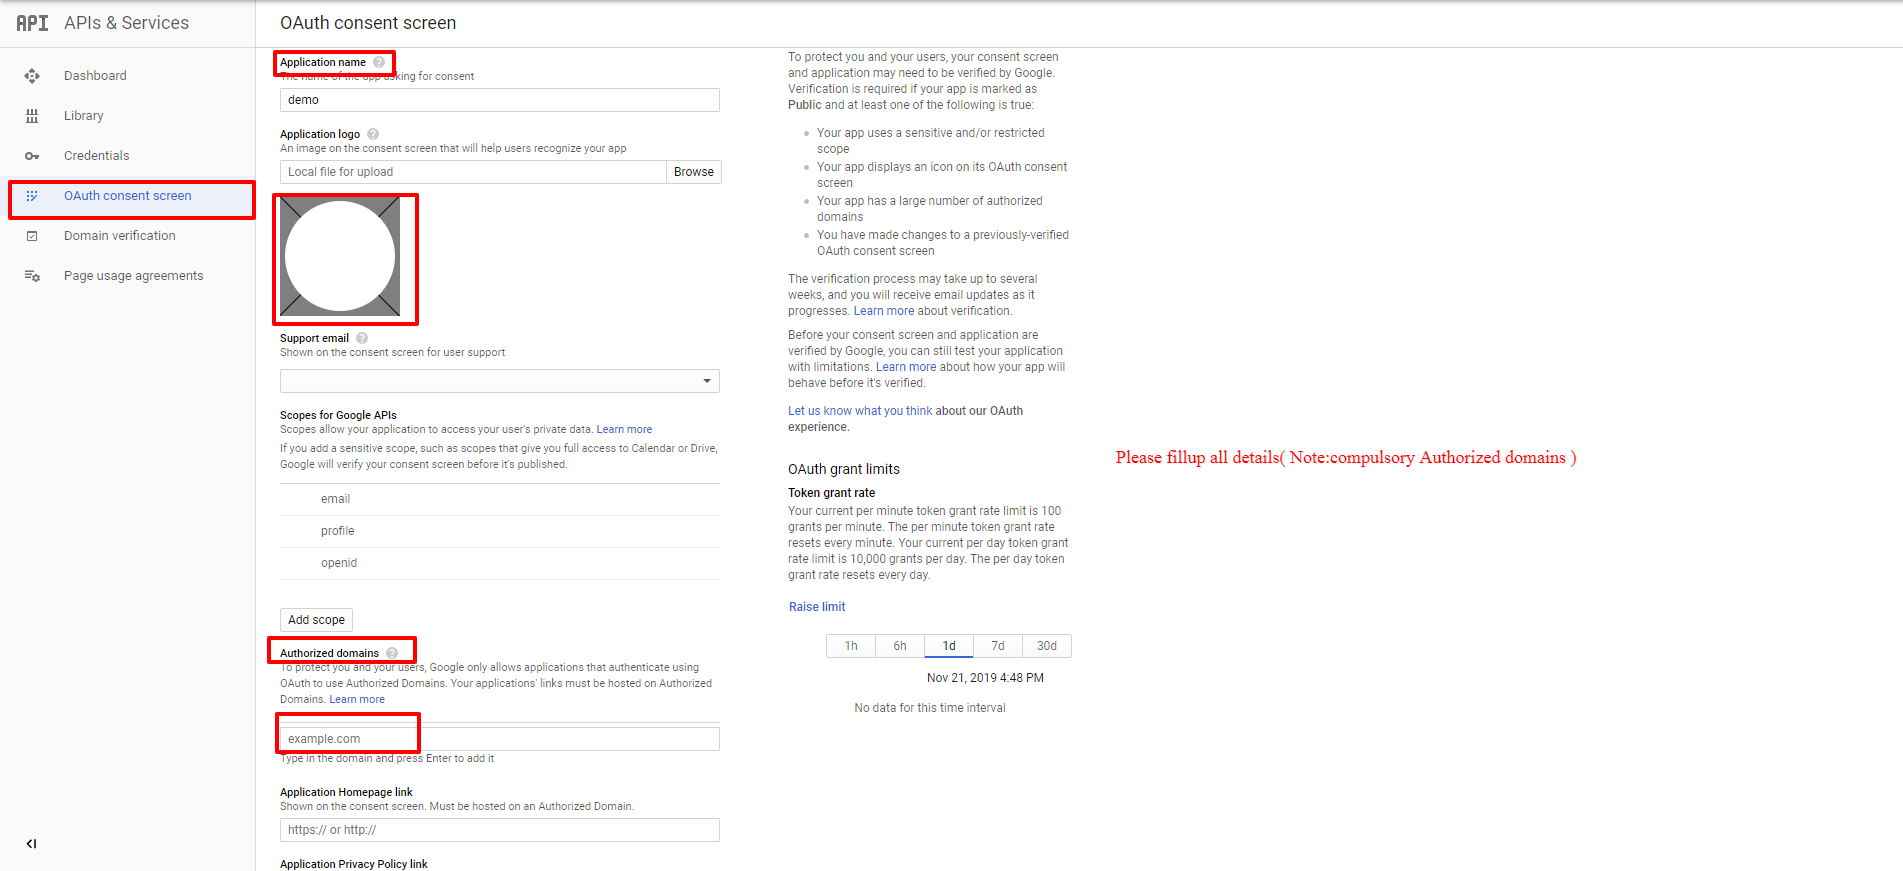
- Go to Oauth consent screen and fill up all fields like(Application name, Application logo, Authorized domains). Do not forget to save your changes.
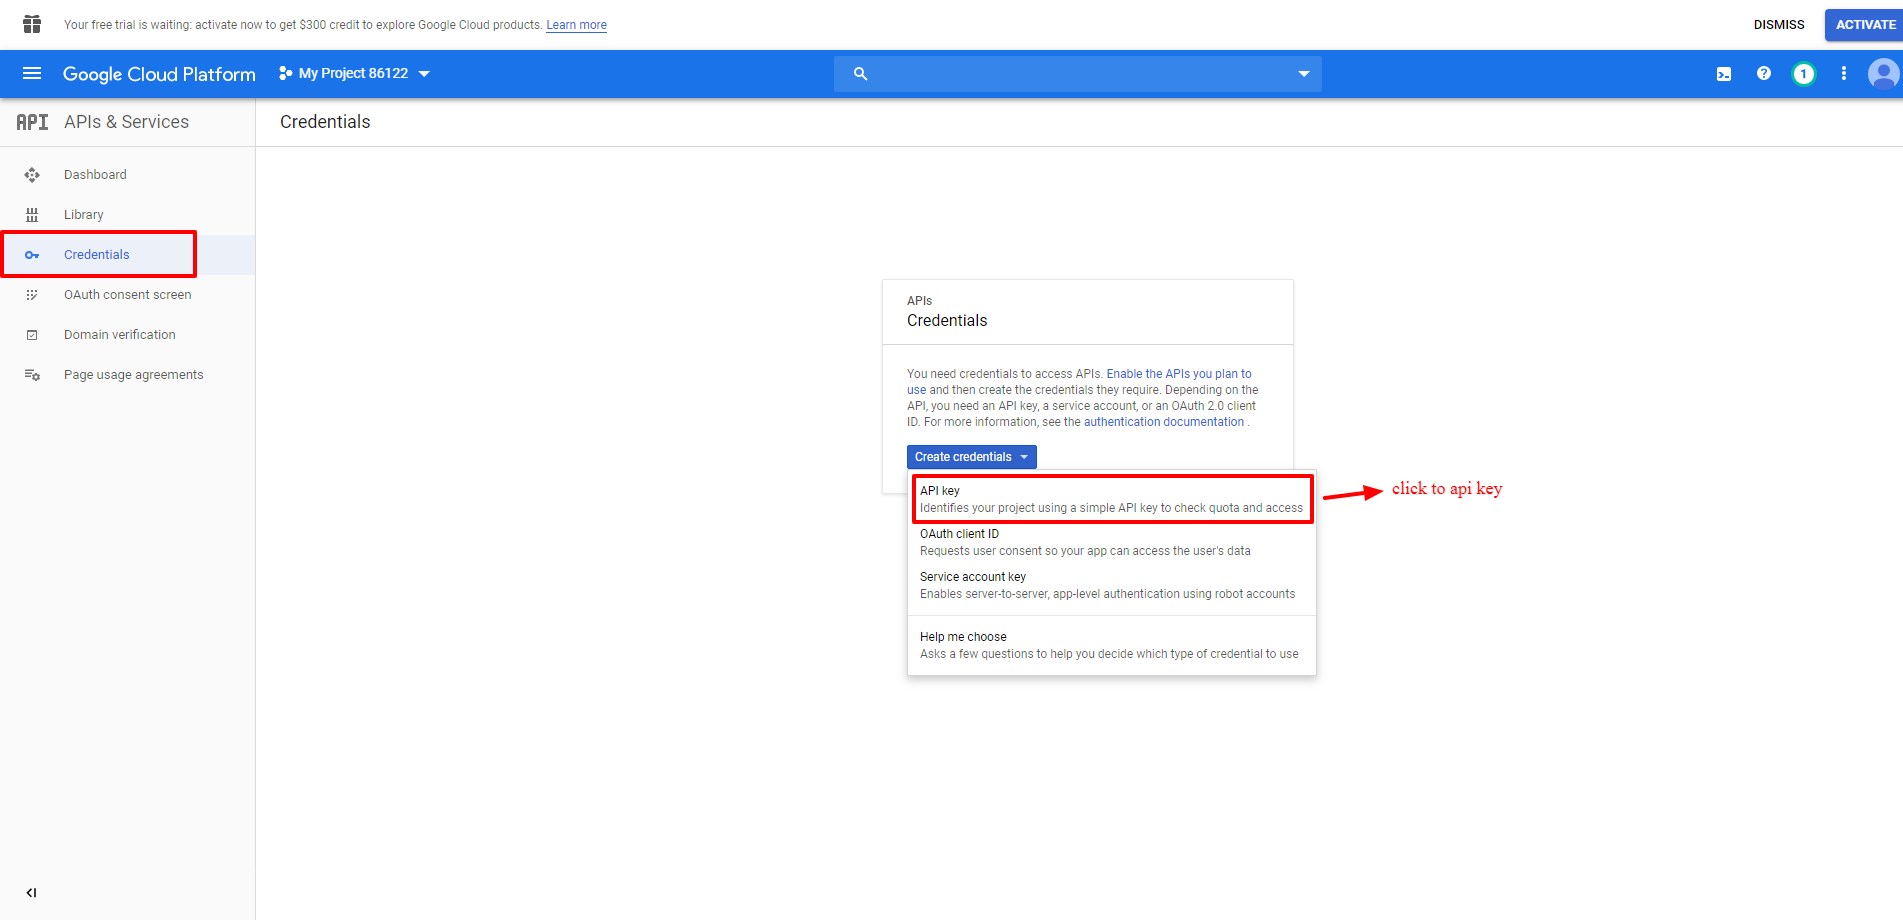
- To Create the Api Key go to "Credentials" and Select "API Key" from the dropdown.
- To Create oauth client ID and Select "OAuth Client ID" from the dropdown.
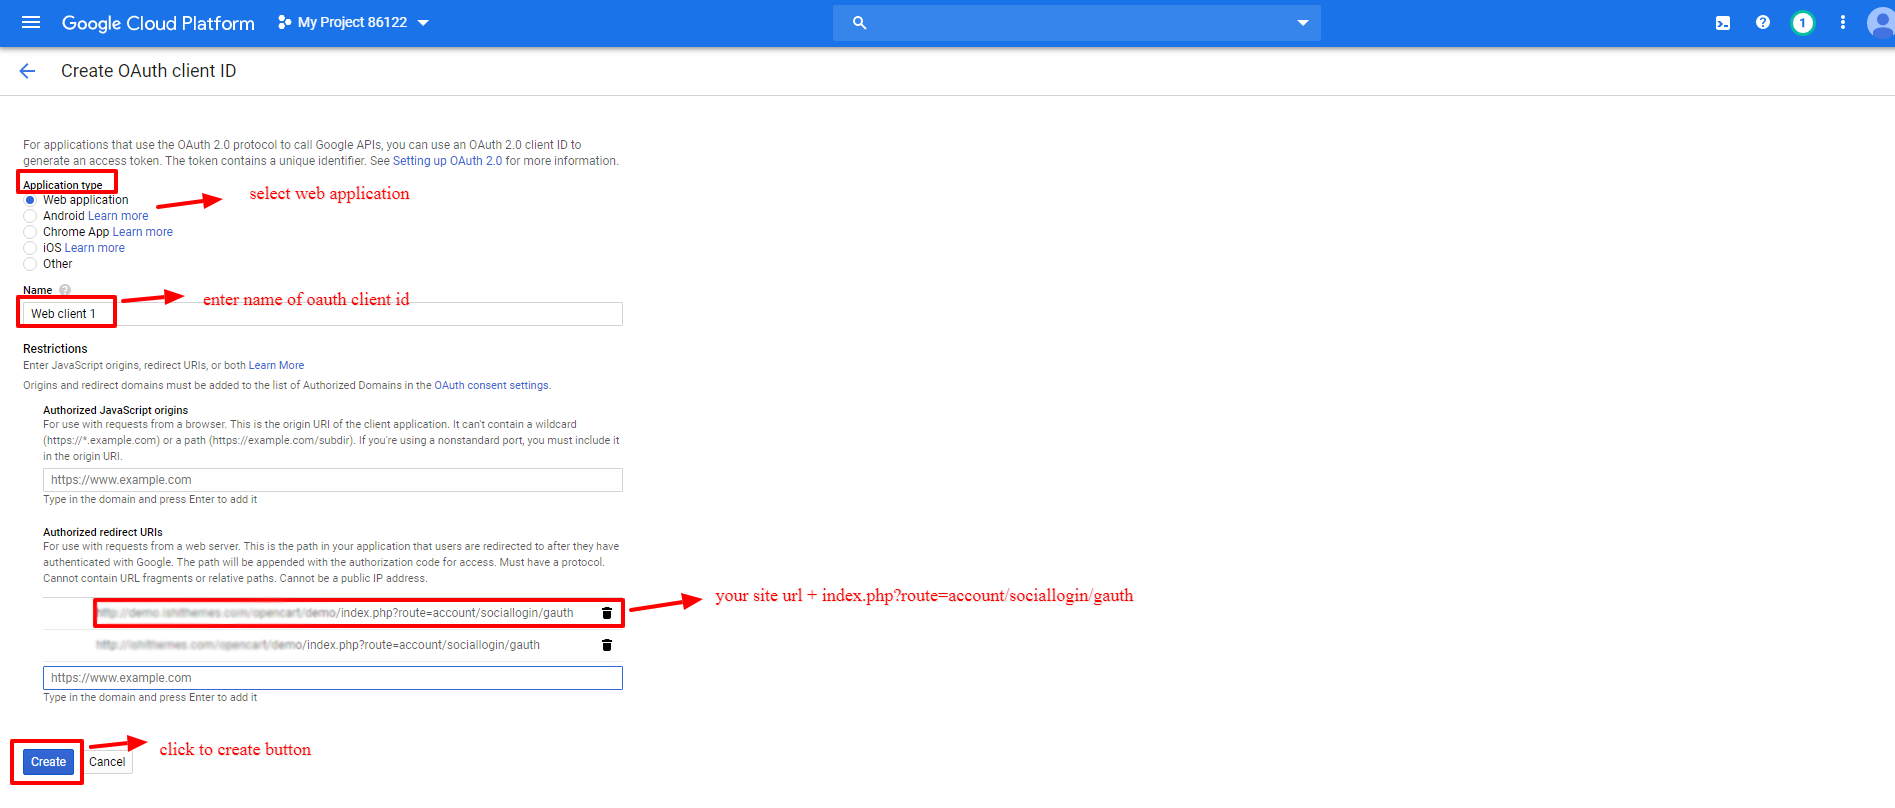
- Take help from following items fill up the form.
- A)Application Type :select web application
- B)Name :enter oauth client id name
- C)Authorized Redirect urls : If your store url is https://www.google.com/ then your Redirect URL should be : https://www.google.com/index.php?route=account/sociallogin/gauth
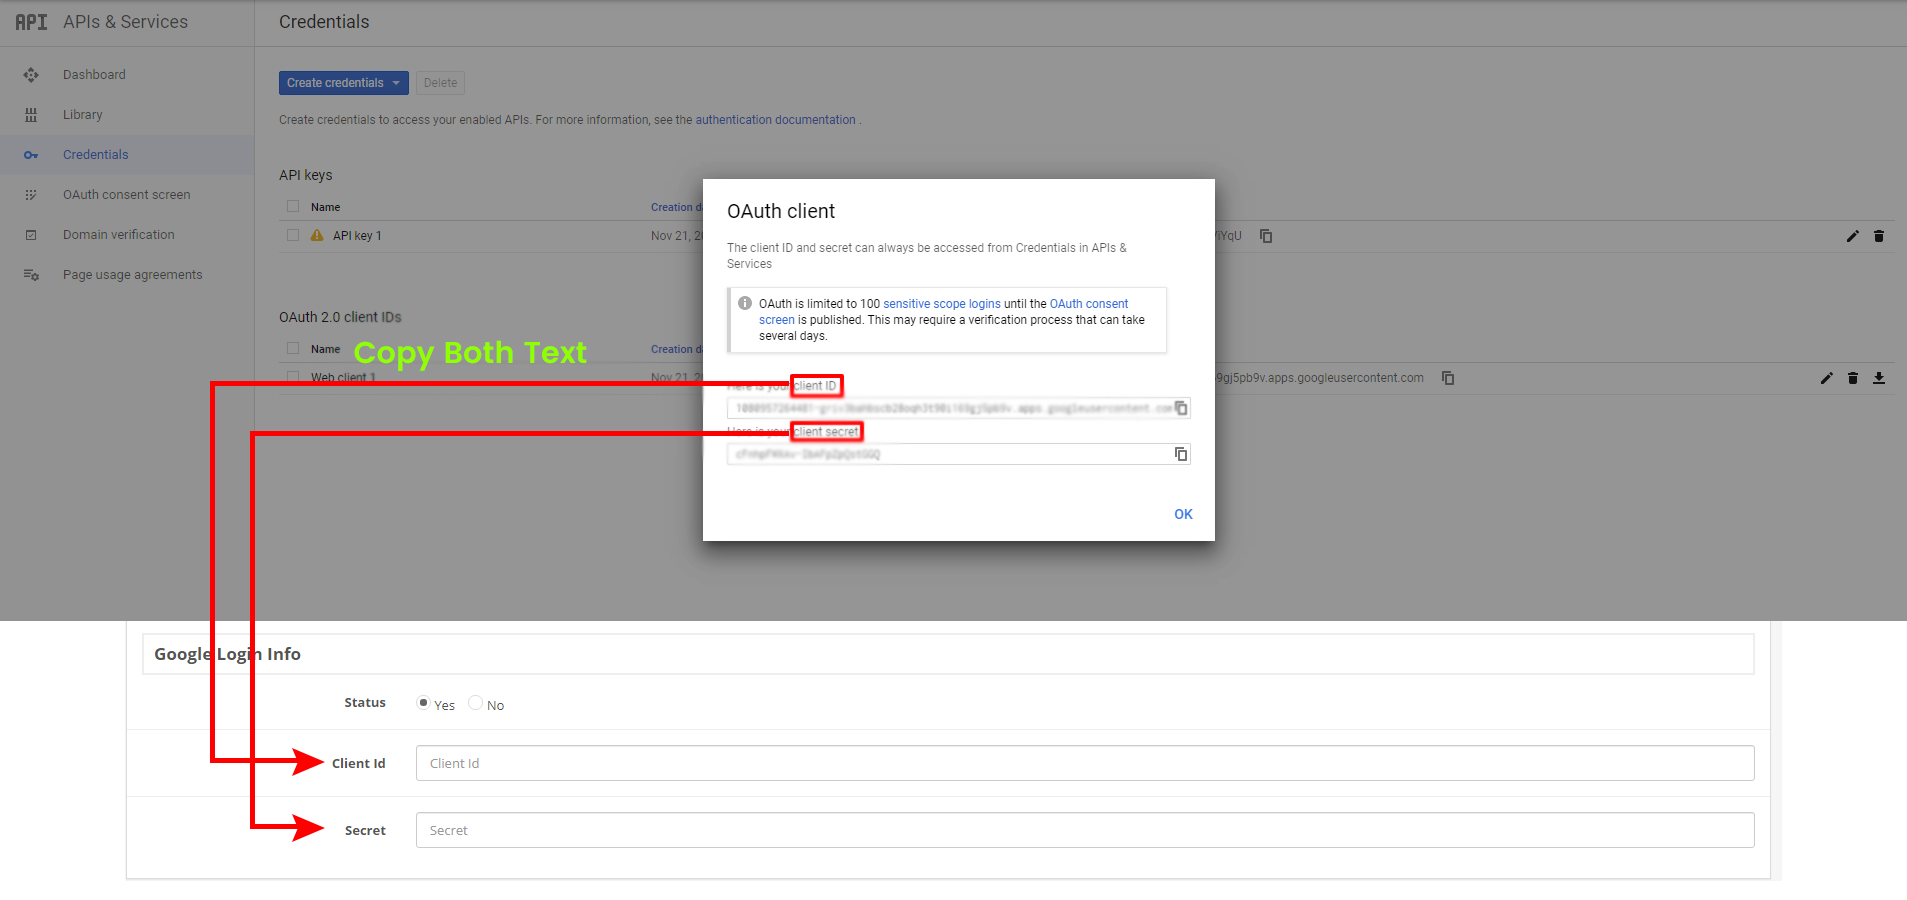
- Put Client ID & App Secret from Google app to your Opencart Extesion. Now the extension is ready to login using Gmail!
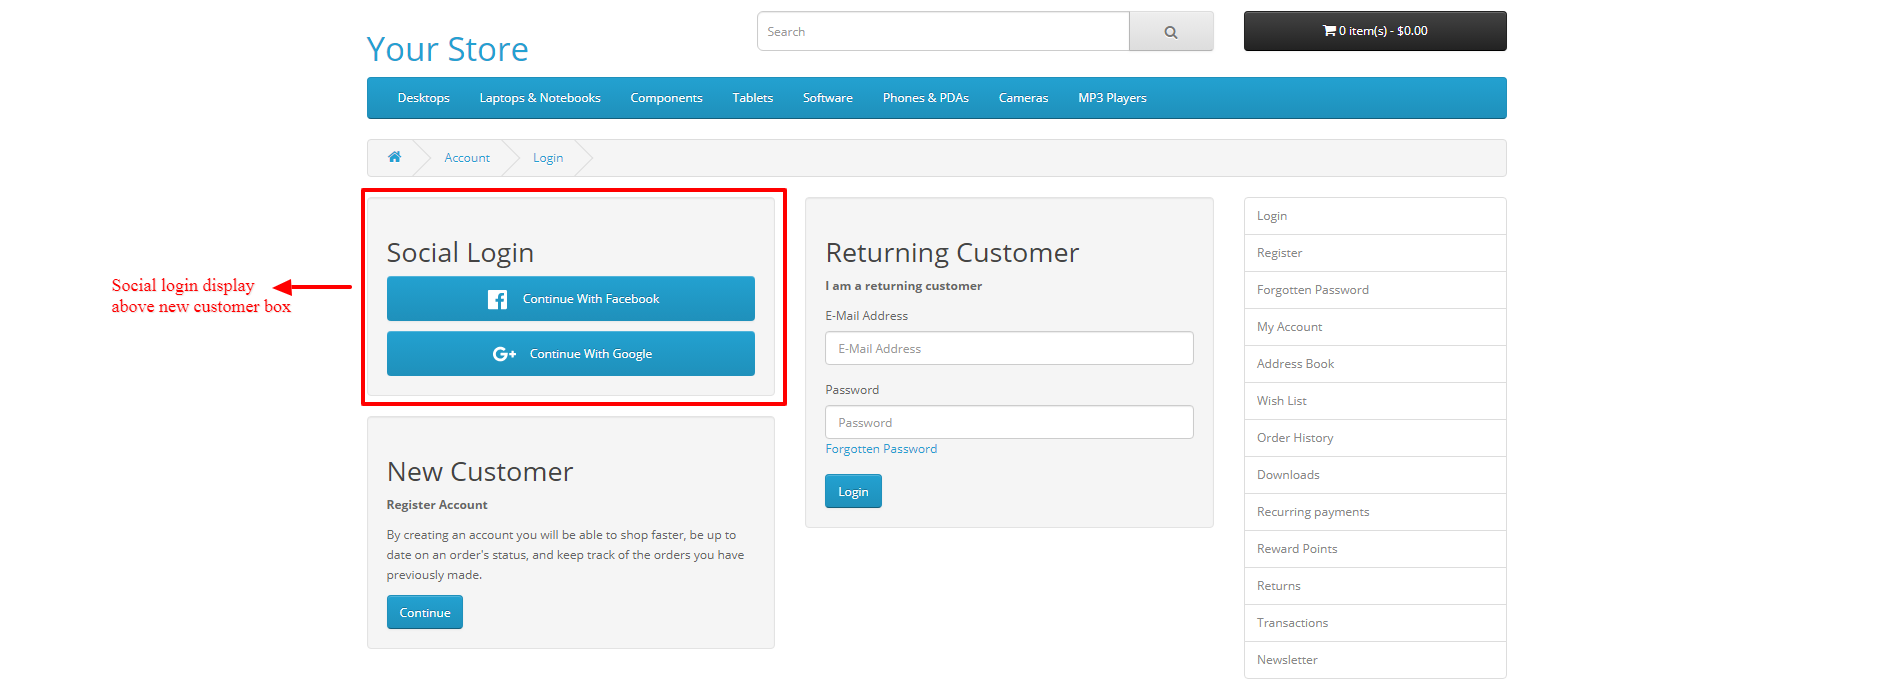
- Social Login At Front Side